Overview
Welcome to Cloud Command! This guide walks you through your Partner Dashboard and Account Settings so you can hit the ground running. By the end of this article, you'll know how to navigate the platform, update your profile and company details, manage users and roles, review activity logs, and more.
Your Partner Dashboard
The Partner Dashboard is your home base. After logging in, you'll land here and get an instant snapshot of your entire organization.
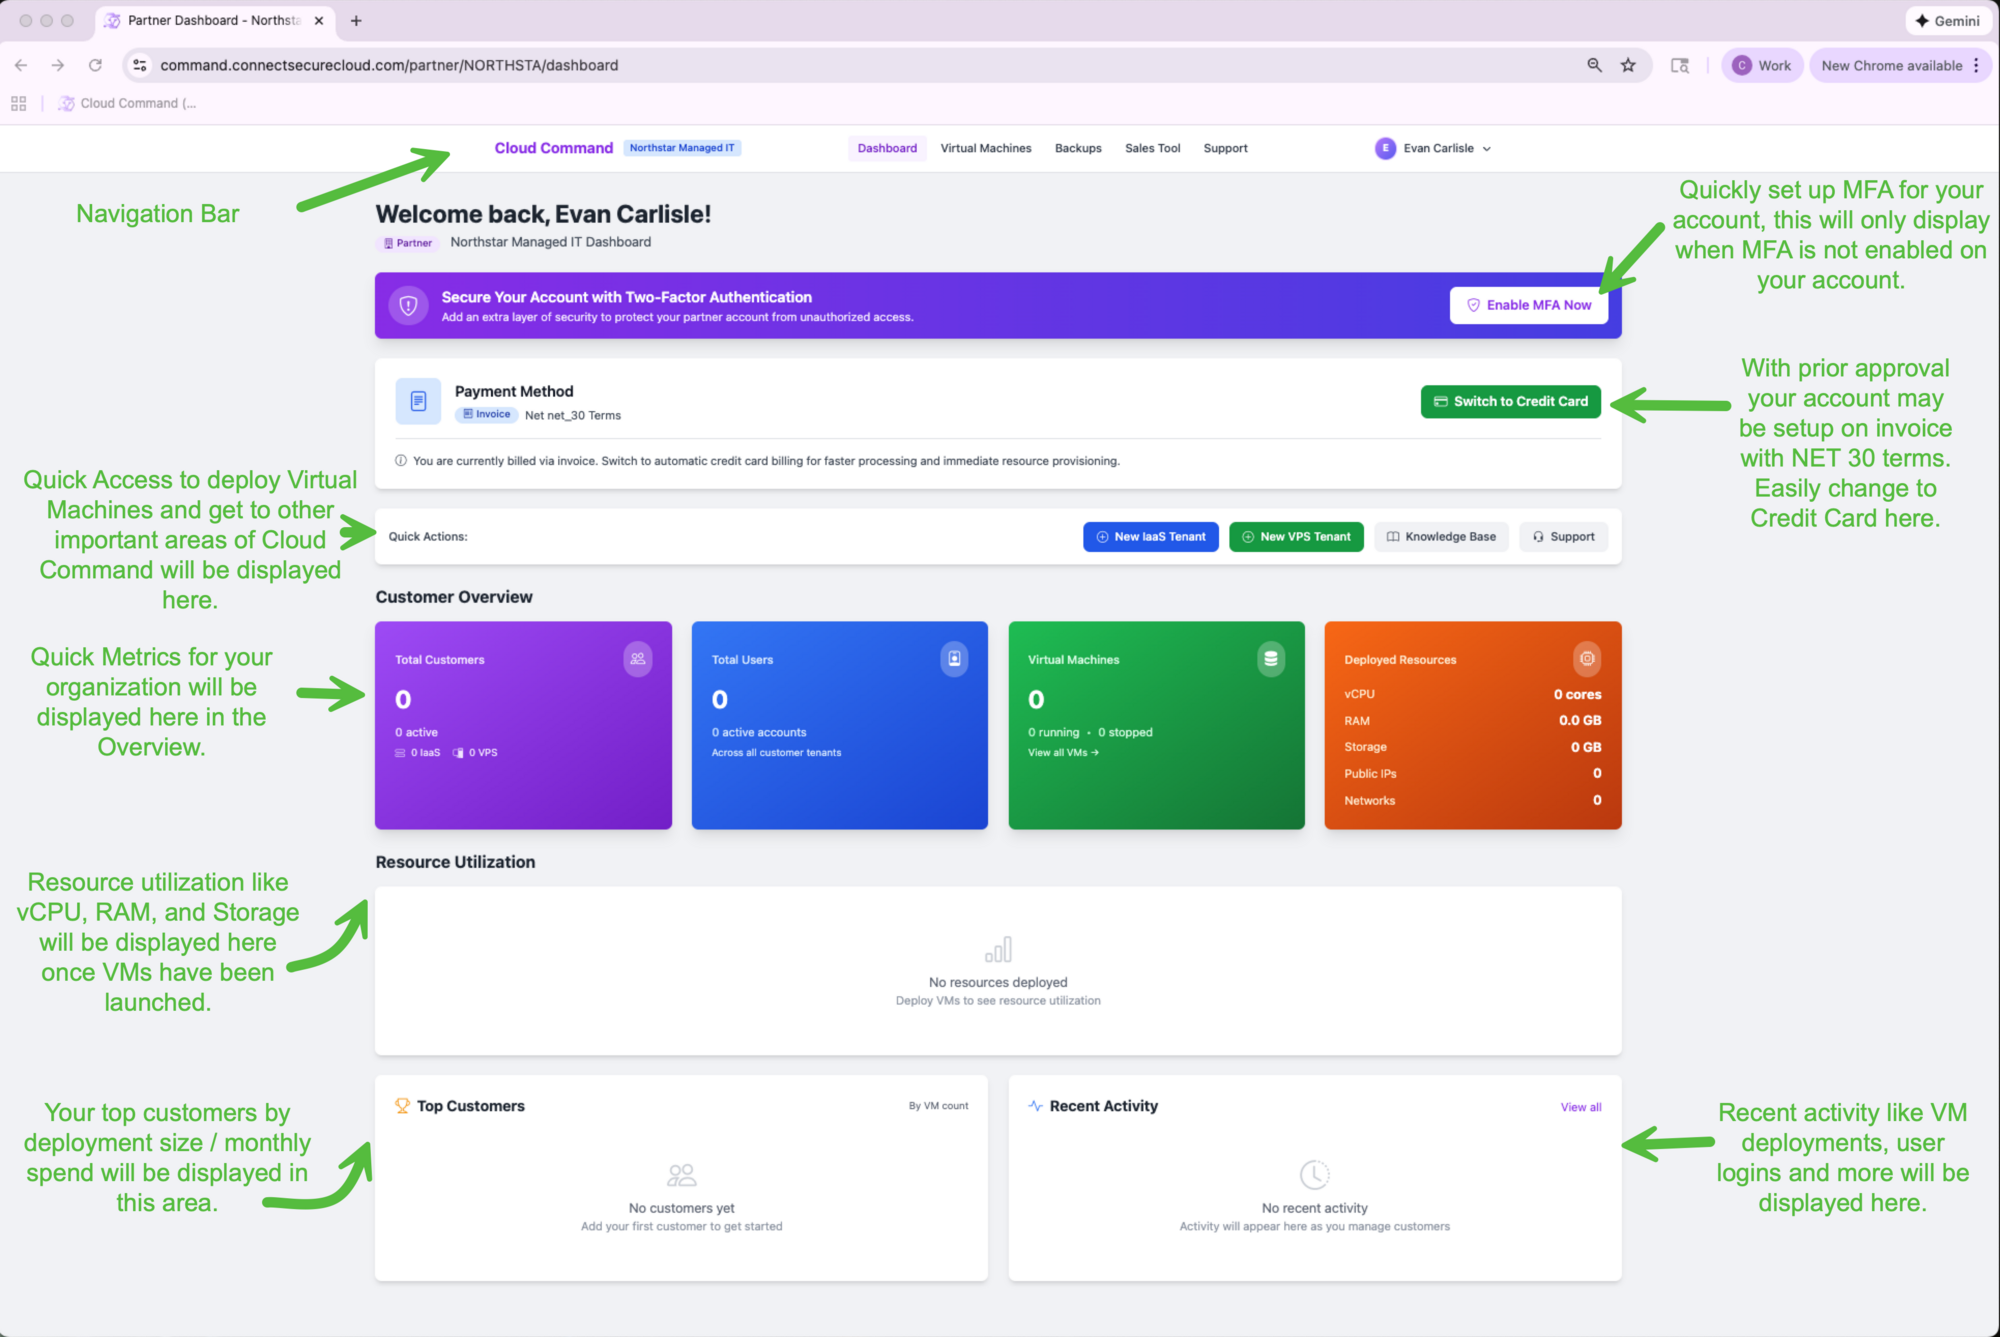
Here's what you'll find on the dashboard:
- MFA Prompt If two-factor authentication isn't enabled on your account yet, you'll see a banner prompting you to set it up. We highly recommend enabling this right away.
- Payment Method Your current billing method is displayed here. If you're set up on invoice billing (NET 30 terms), you can easily switch to credit card at any time.
- Quick Actions Quickly deploy new IaaS or VPS tenants, access the Knowledge Base, or open a support ticket without navigating away from the dashboard.
- Customer Overview See your total customers, total users, virtual machine count, and deployed resources (vCPU, RAM, Storage, Public IPs, Networks) at a glance.
- Resource Utilization Once you have VMs deployed, this section displays vCPU, RAM, and Storage utilization across your organization.
- Top Customers Your largest customers by VM count and monthly spend are displayed here to help you keep a pulse on your business.
- Recent Activity VM deployments, user logins, and other important events show up here so you always know what's happening.
Navigation and Quick Actions
The top navigation bar gives you access to every area of Cloud Command. Click on your name in the upper right corner to reveal a dropdown menu with additional options.
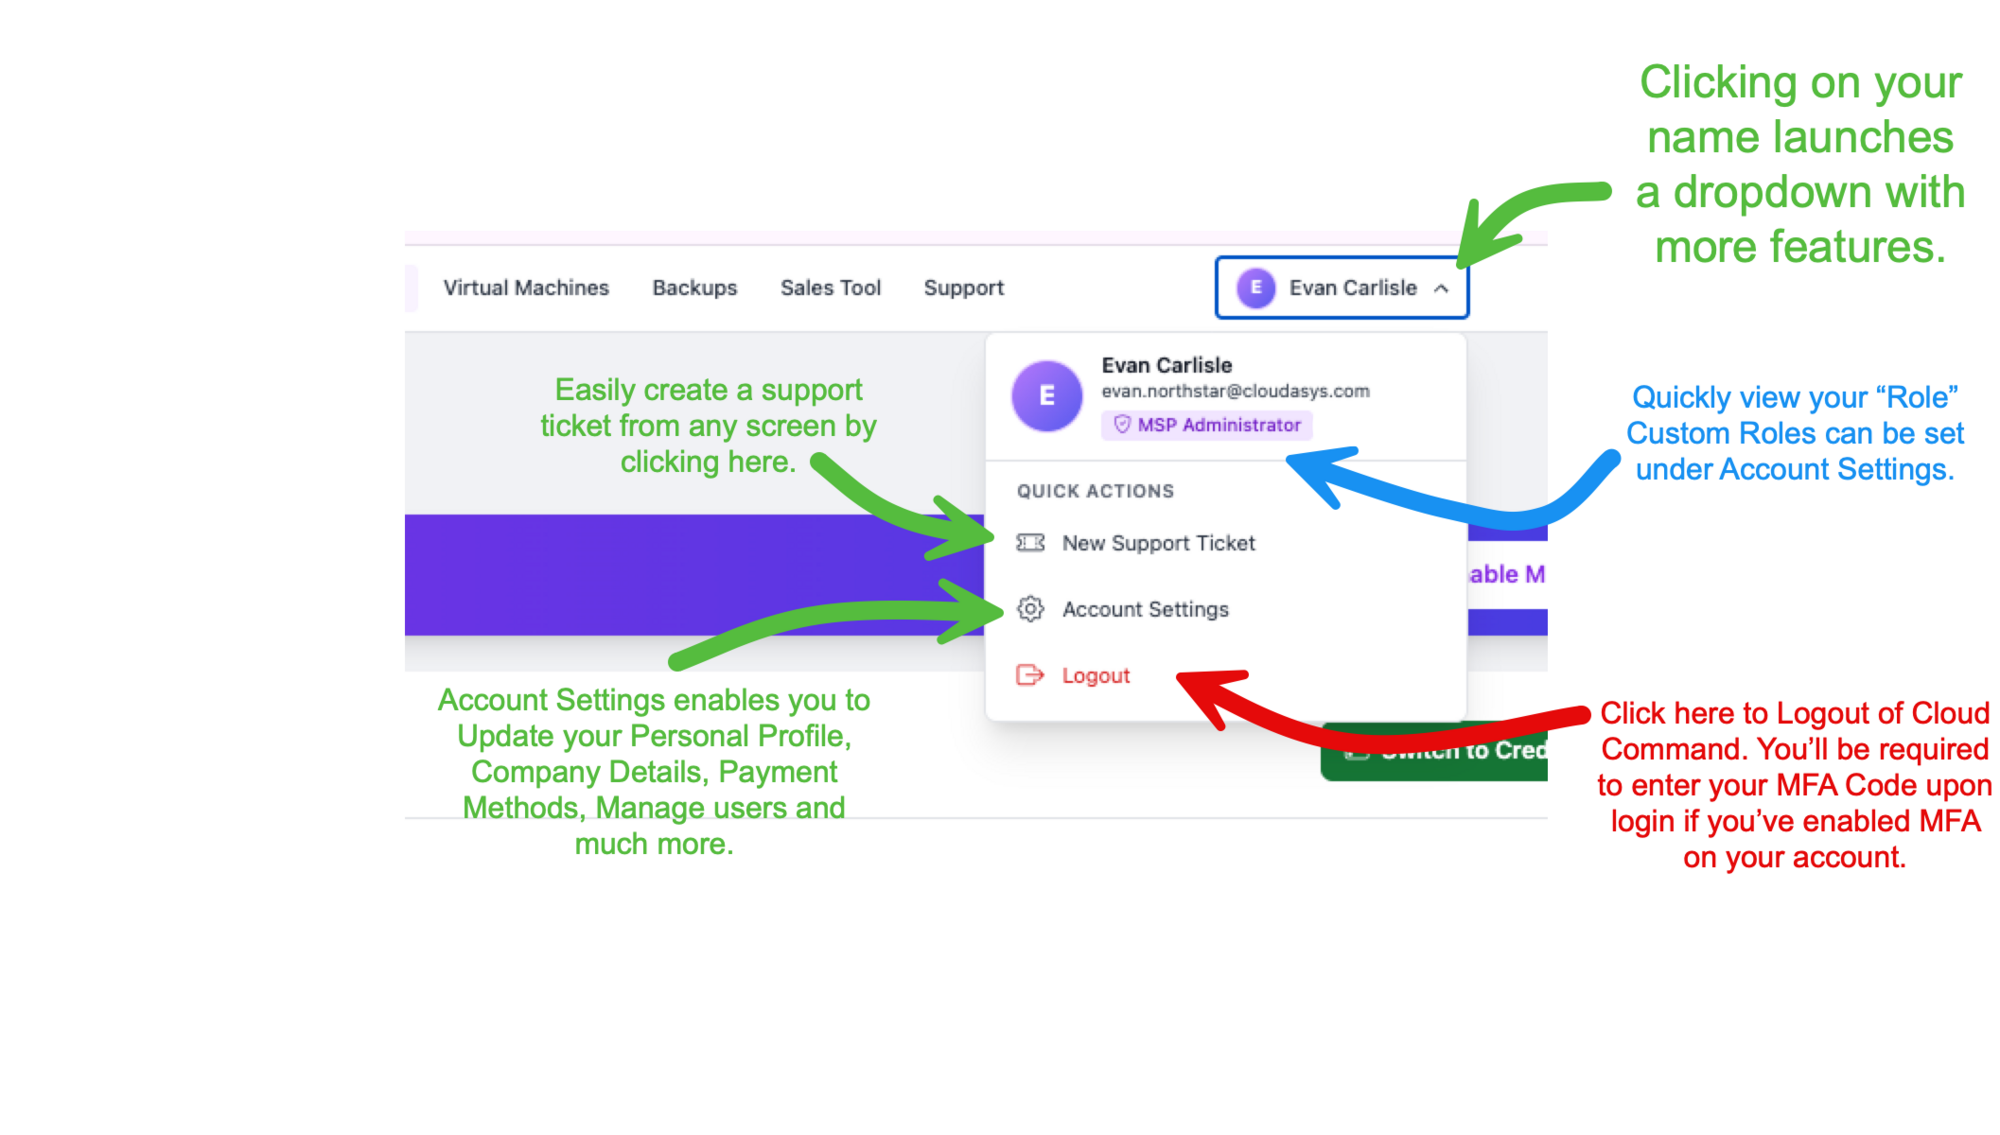
The dropdown shows your name, email, and current role (such as MSP Administrator). From here you can:
- New Support Ticket Create a support ticket from any screen without navigating away from what you're doing.
- Account Settings Access your personal profile, company details, payment methods, user management, and more.
- Logout Sign out of Cloud Command. If you have MFA enabled, you'll be prompted to enter your code on your next login.
Account Settings Overview
Account Settings is your central hub for managing everything about your organization inside Cloud Command. Navigate here by clicking your name in the top-right corner and selecting Account Settings.
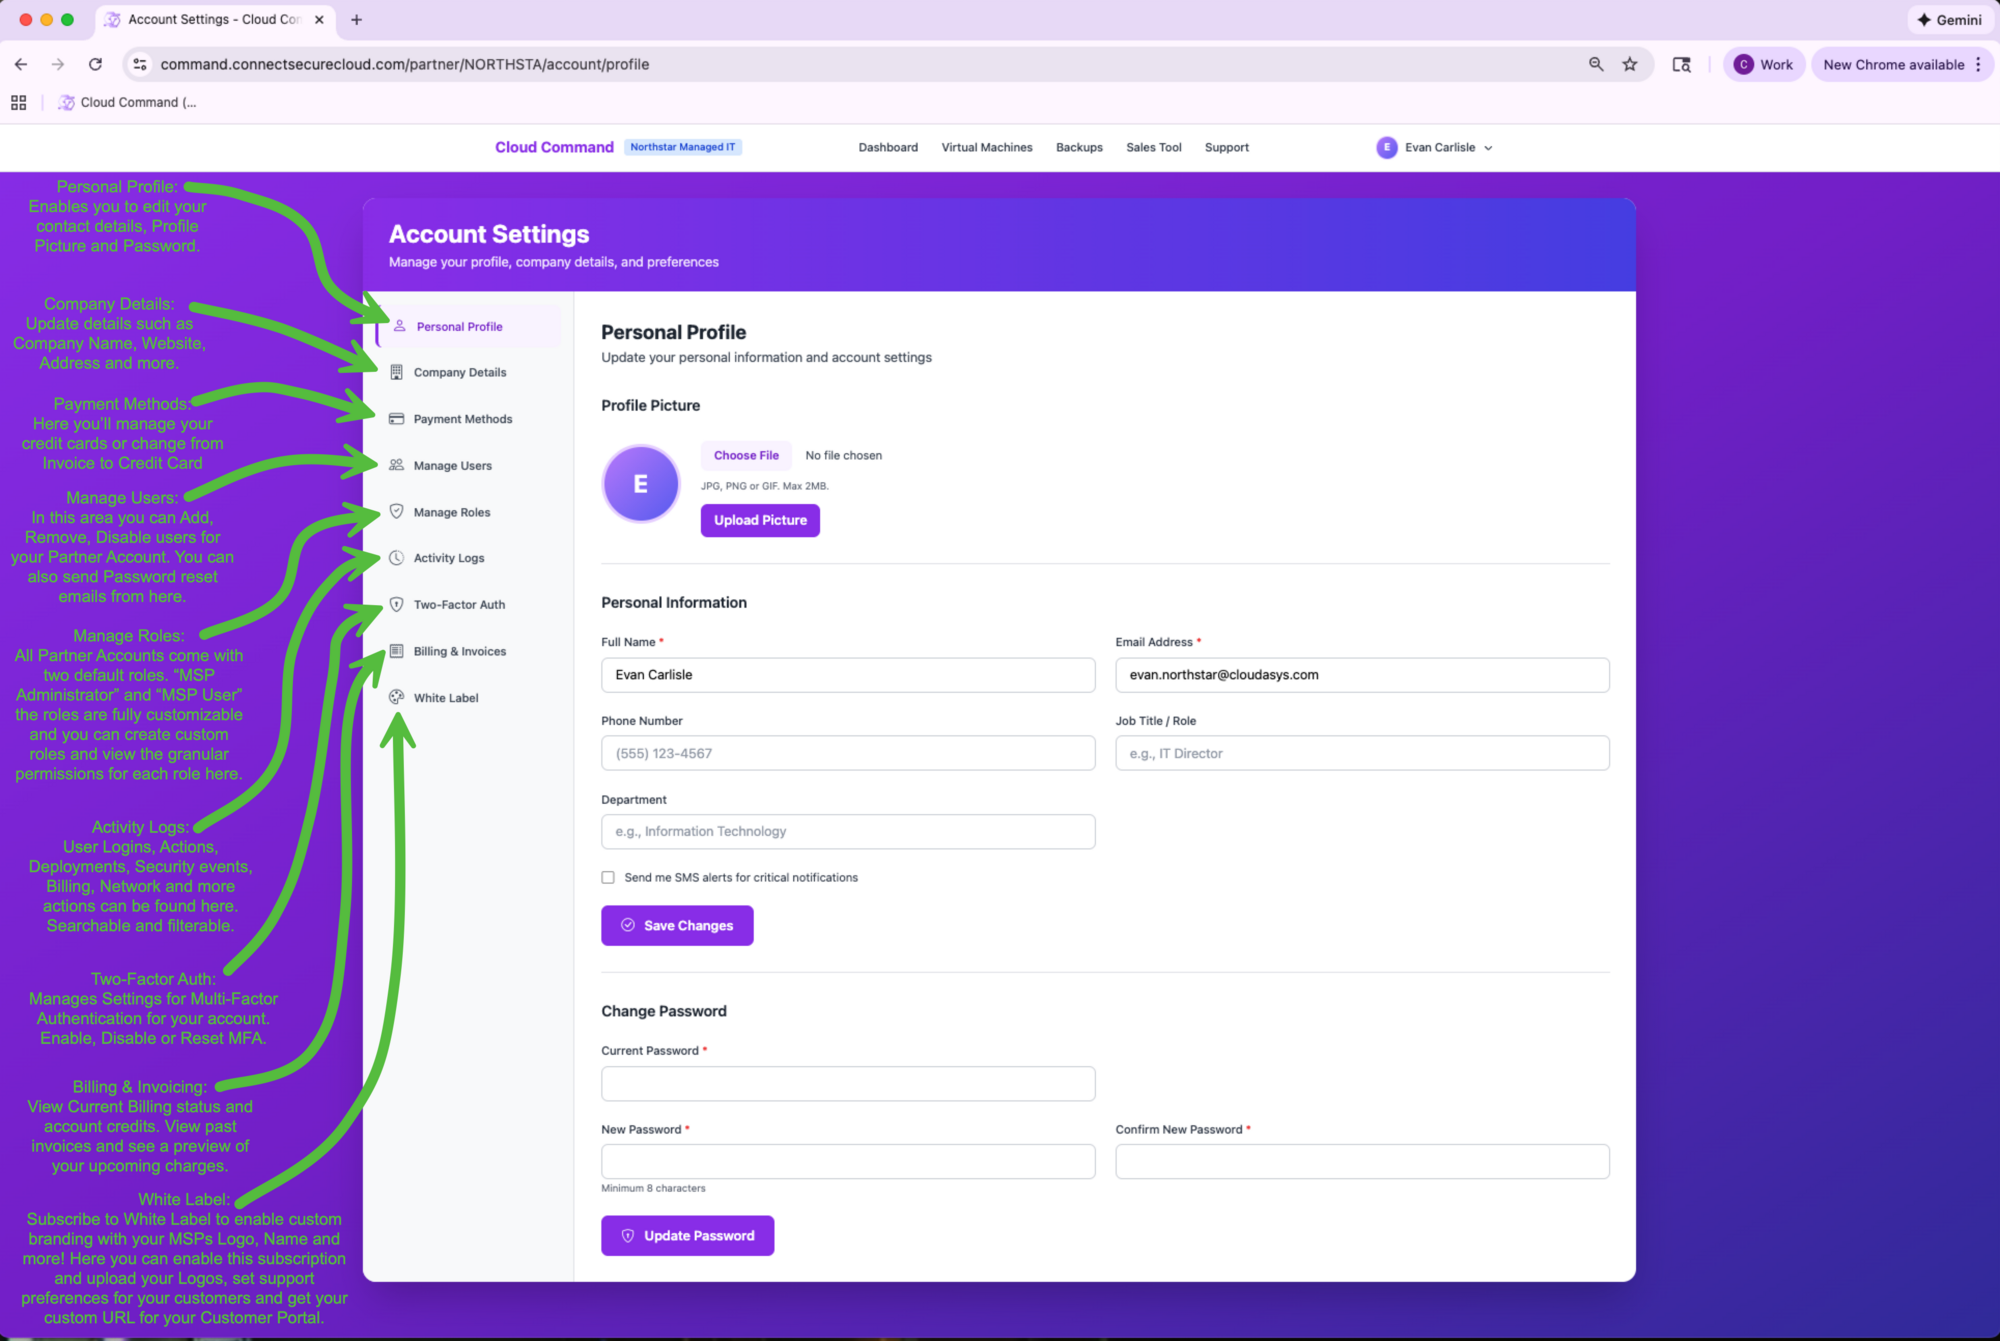
The left sidebar organizes your settings into these sections:
- Personal Profile Edit your contact details, profile picture, and password.
- Company Details Update your company name, website, address, and other business information.
- Payment Methods Manage your credit cards or switch from invoice billing to credit card.
- Manage Users Add, remove, and manage users for your partner account. Send password reset emails from here as well.
- Manage Roles Your account comes with two default roles: MSP Administrator and MSP User. Create custom roles with granular permissions to fit your team's needs.
- Activity Logs Track user logins, deployments, security events, billing changes, and more. All actions are searchable and filterable.
- Two-Factor Auth Enable, disable, or reset multi-factor authentication for your account.
- Billing & Invoices View your current billing status, account credits, past invoices, and a preview of upcoming charges.
- White Label Subscribe to White Label branding so your customers see your company logo and name instead of Cloud Command.
Let's walk through each section.
Personal Profile
Your personal profile is where you manage your own contact information and login credentials.
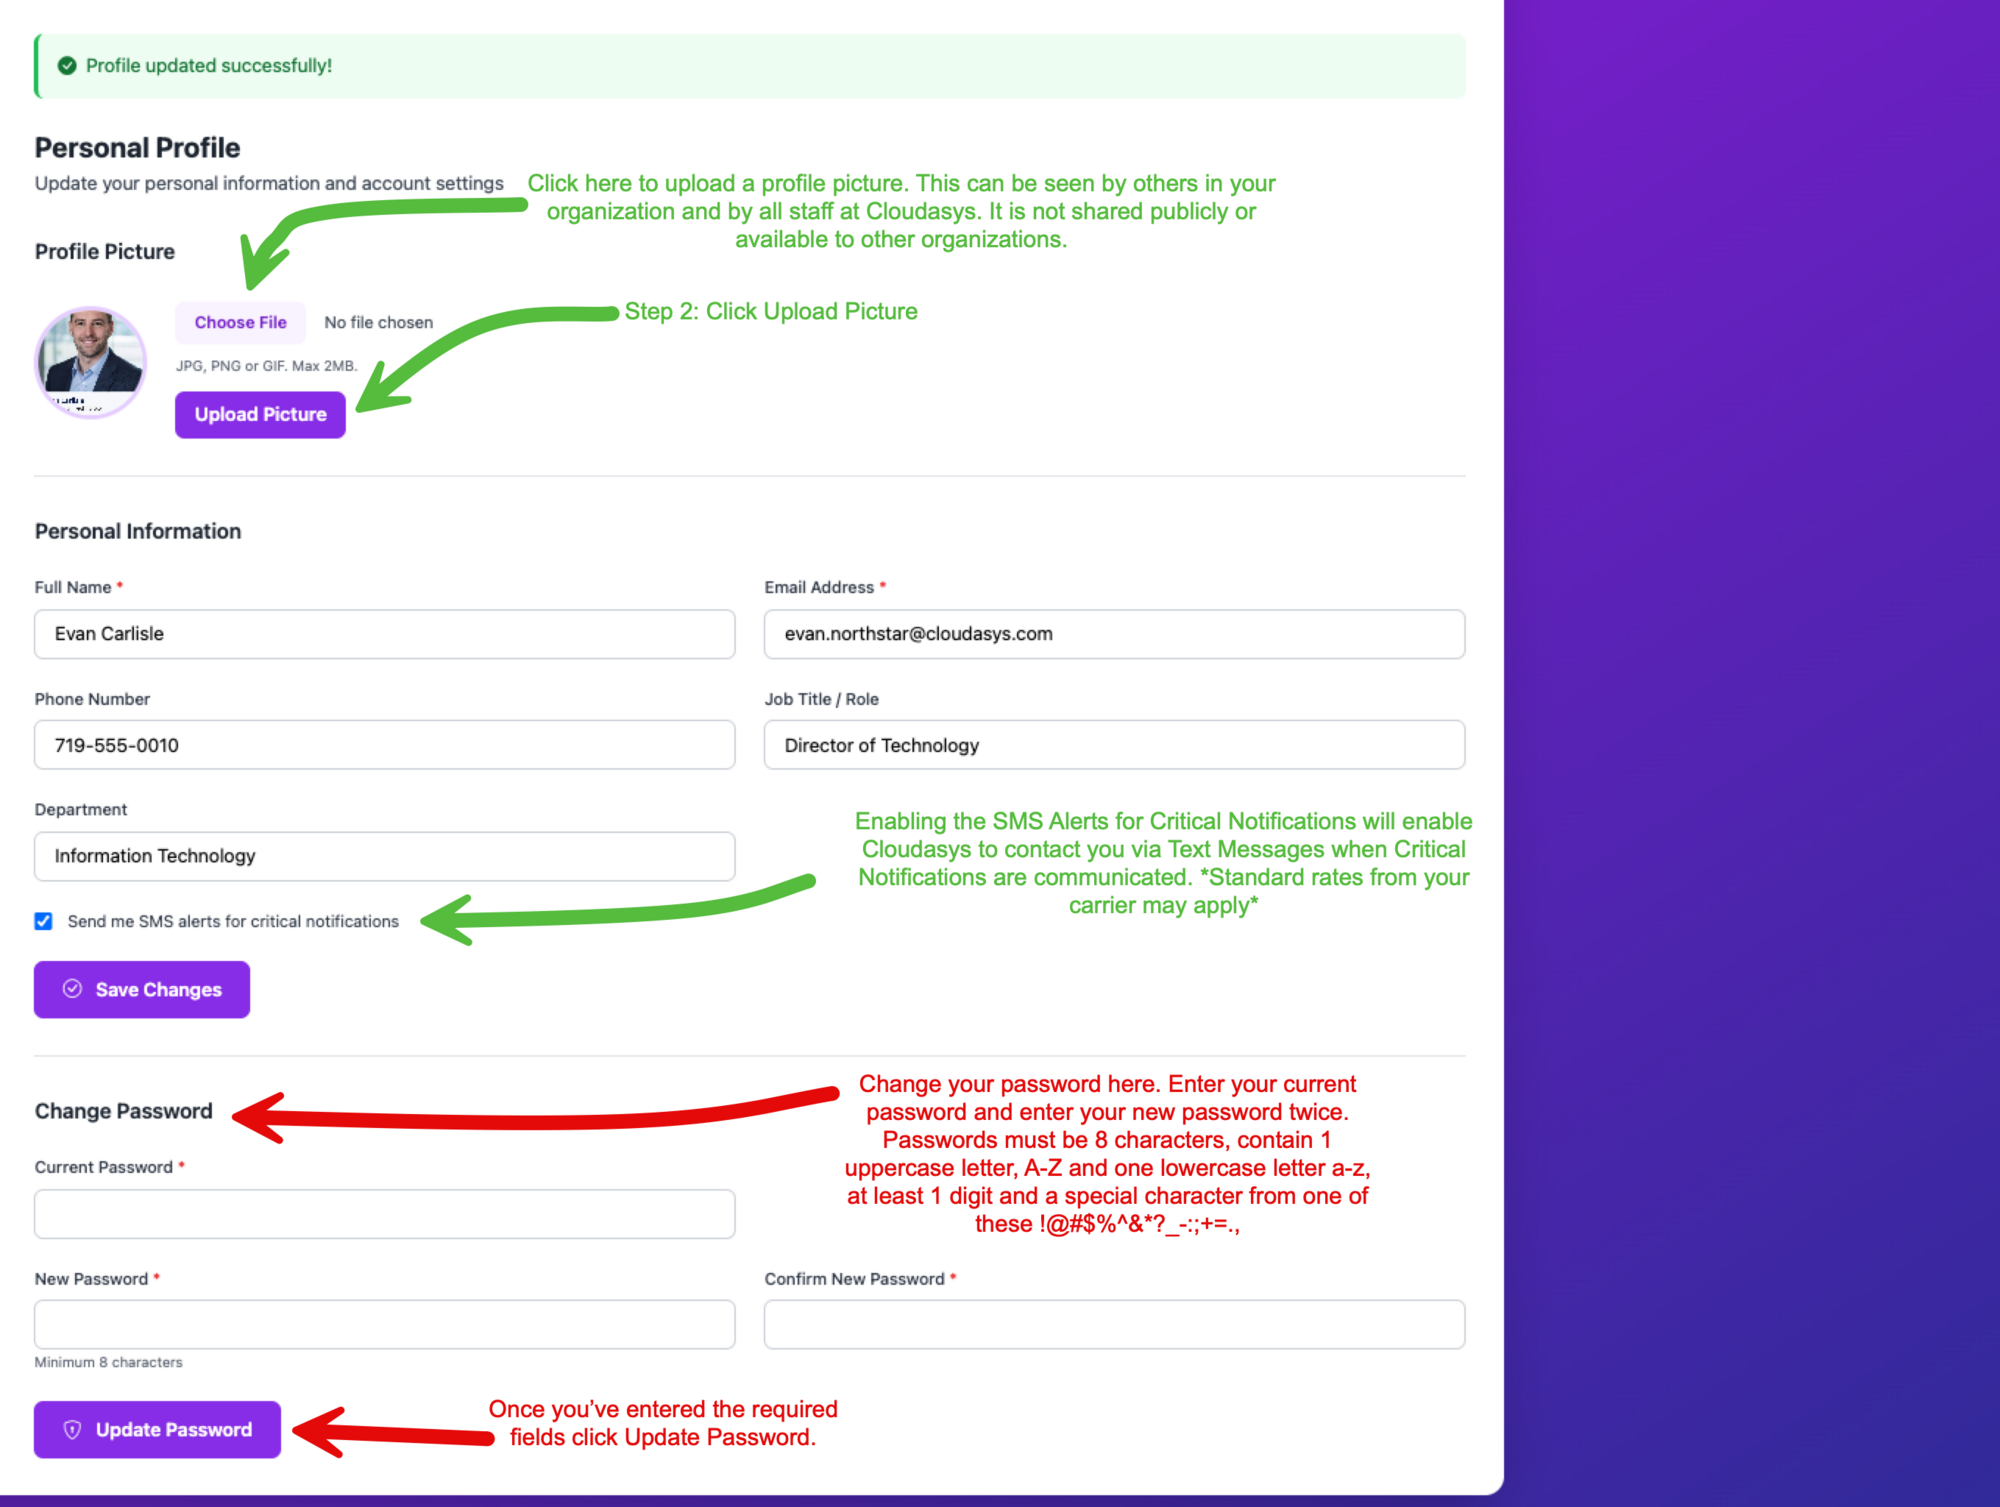
Profile Picture
Upload a profile picture by clicking Choose File and then Upload Picture. Accepted formats are JPG, PNG, or GIF with a maximum size of 2MB. Your profile picture is visible to others in your organization and to Cloudasys staff. It is not shared publicly.
Personal Information
Update your full name, email address, phone number, job title, and department. If you'd like to receive text message alerts for critical notifications, check the Send me SMS alerts for critical notifications box. Standard carrier rates may apply.
Click Save Changes when you're done.
Change Password
To update your password, enter your current password followed by your new password twice. Passwords must be at least 8 characters and include one uppercase letter, one lowercase letter, one digit, and one special character. Click Update Password to save.
Company Details
Keep your company information up to date so Cloudasys can better serve you. None of this information is shared outside of Cloudasys.
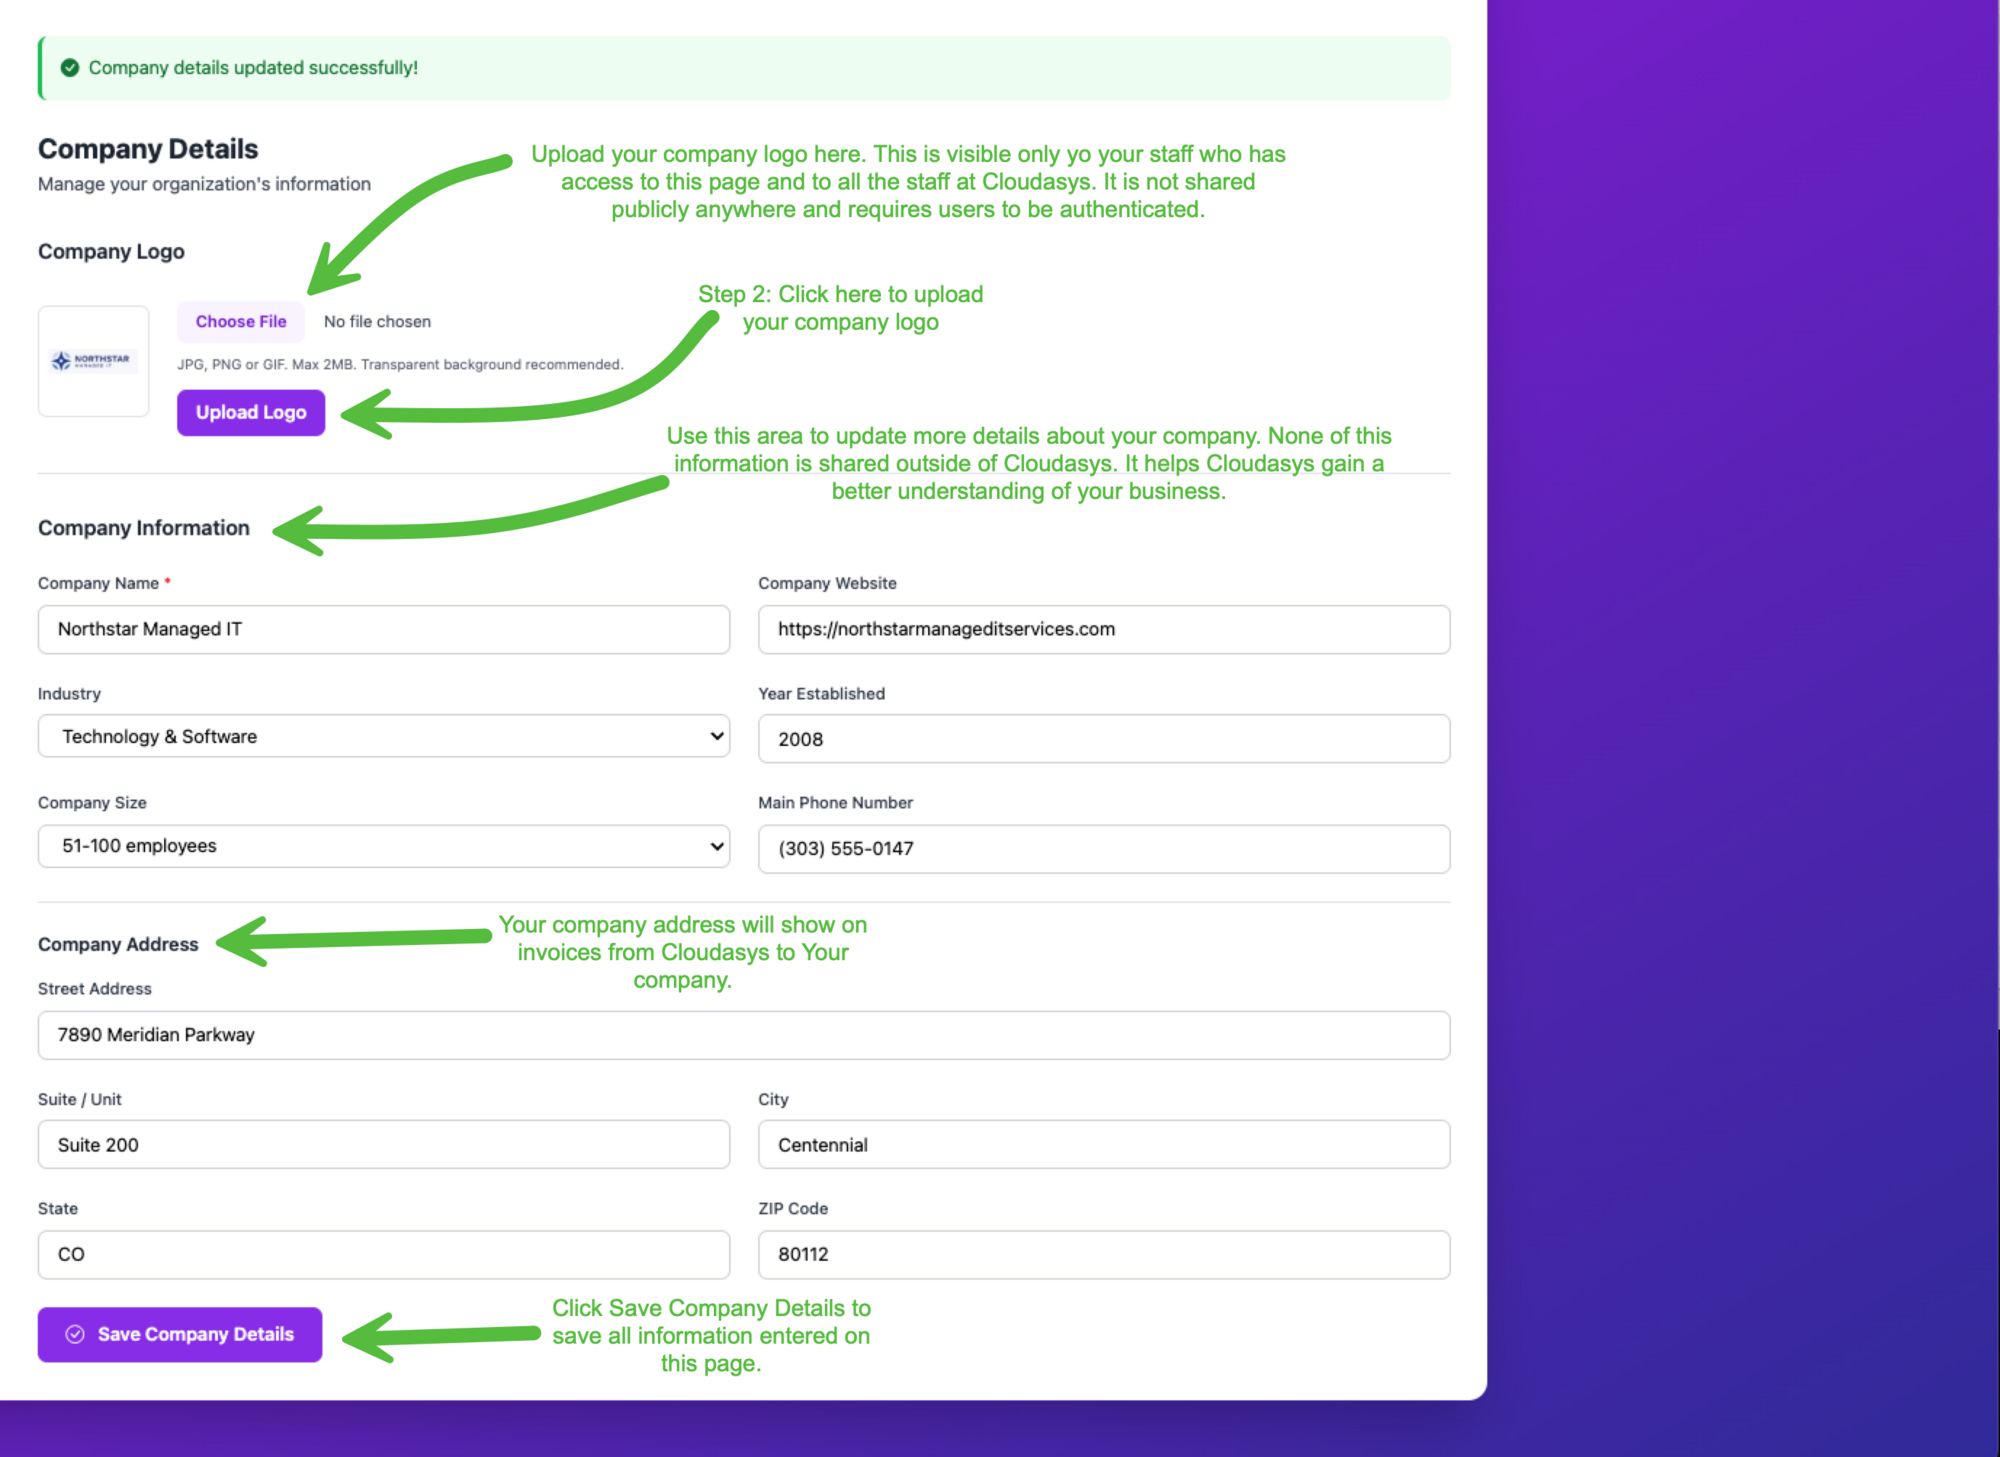
Company Logo
Upload your company logo by clicking Choose File and then Upload Logo. Accepted formats are JPG, PNG, or GIF with a maximum size of 2MB. A transparent background is recommended. Your logo is only visible to authenticated staff within your organization and Cloudasys.
Company Information
Fill in your company name, website, industry, year established, company size, and main phone number. This helps Cloudasys gain a better understanding of your business.
Company Address
Your company address appears on invoices from Cloudasys. Enter your street address, suite/unit, city, state, and ZIP code, then click Save Company Details.
Payment Methods
Manage your payment methods and billing information from this section. You can add a credit card, view your billing details, and switch between invoice and credit card billing.
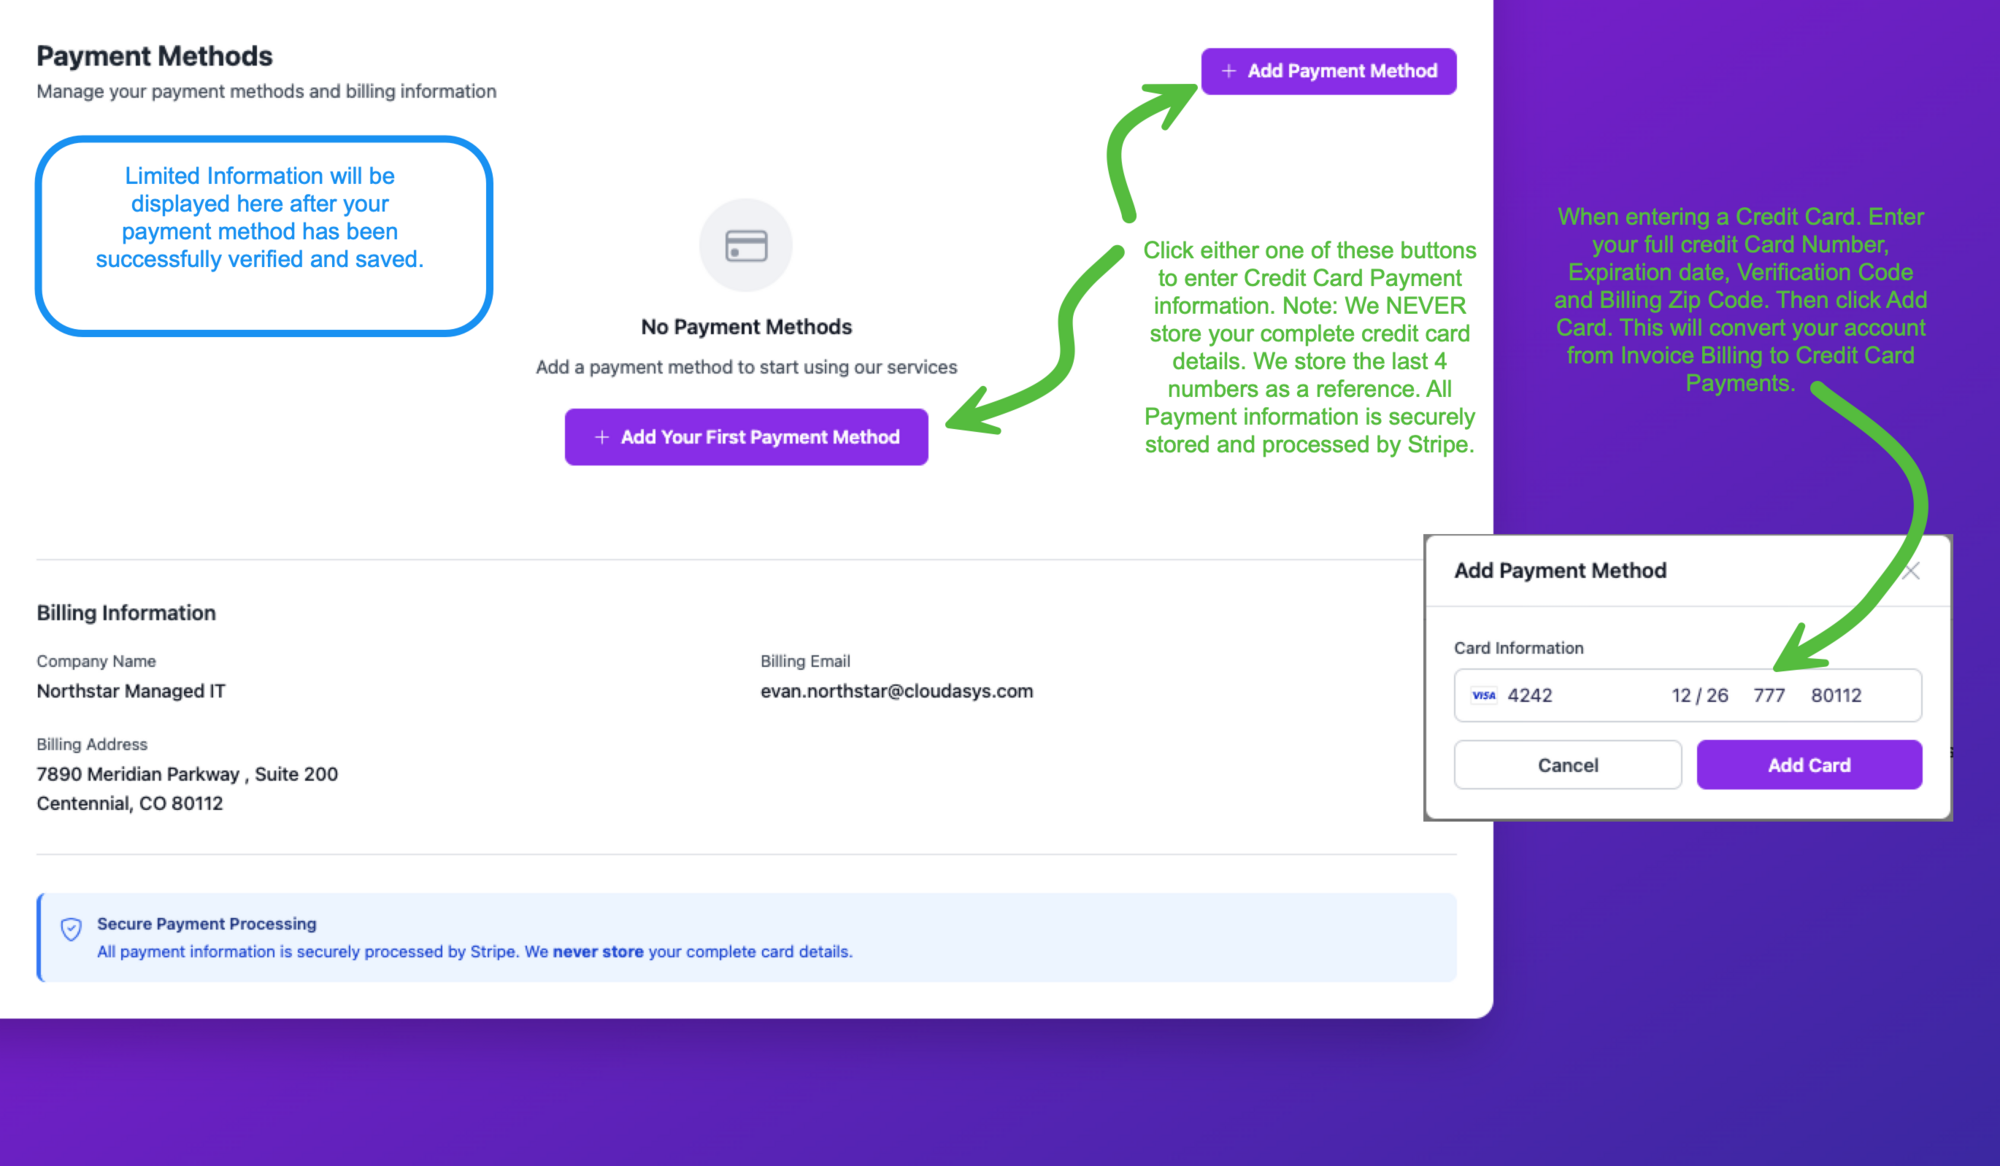
To add a credit card, click Add Payment Method (or Add Your First Payment Method if none are on file). Enter your card number, expiration date, verification code, and billing ZIP code, then click Add Card. Adding a credit card will convert your account from invoice billing to credit card payments.
Your billing information (company name, billing email, and billing address) is also displayed on this page for reference.
Manage Users
Invite team members to Cloud Command, manage their roles, and control access to your partner account.
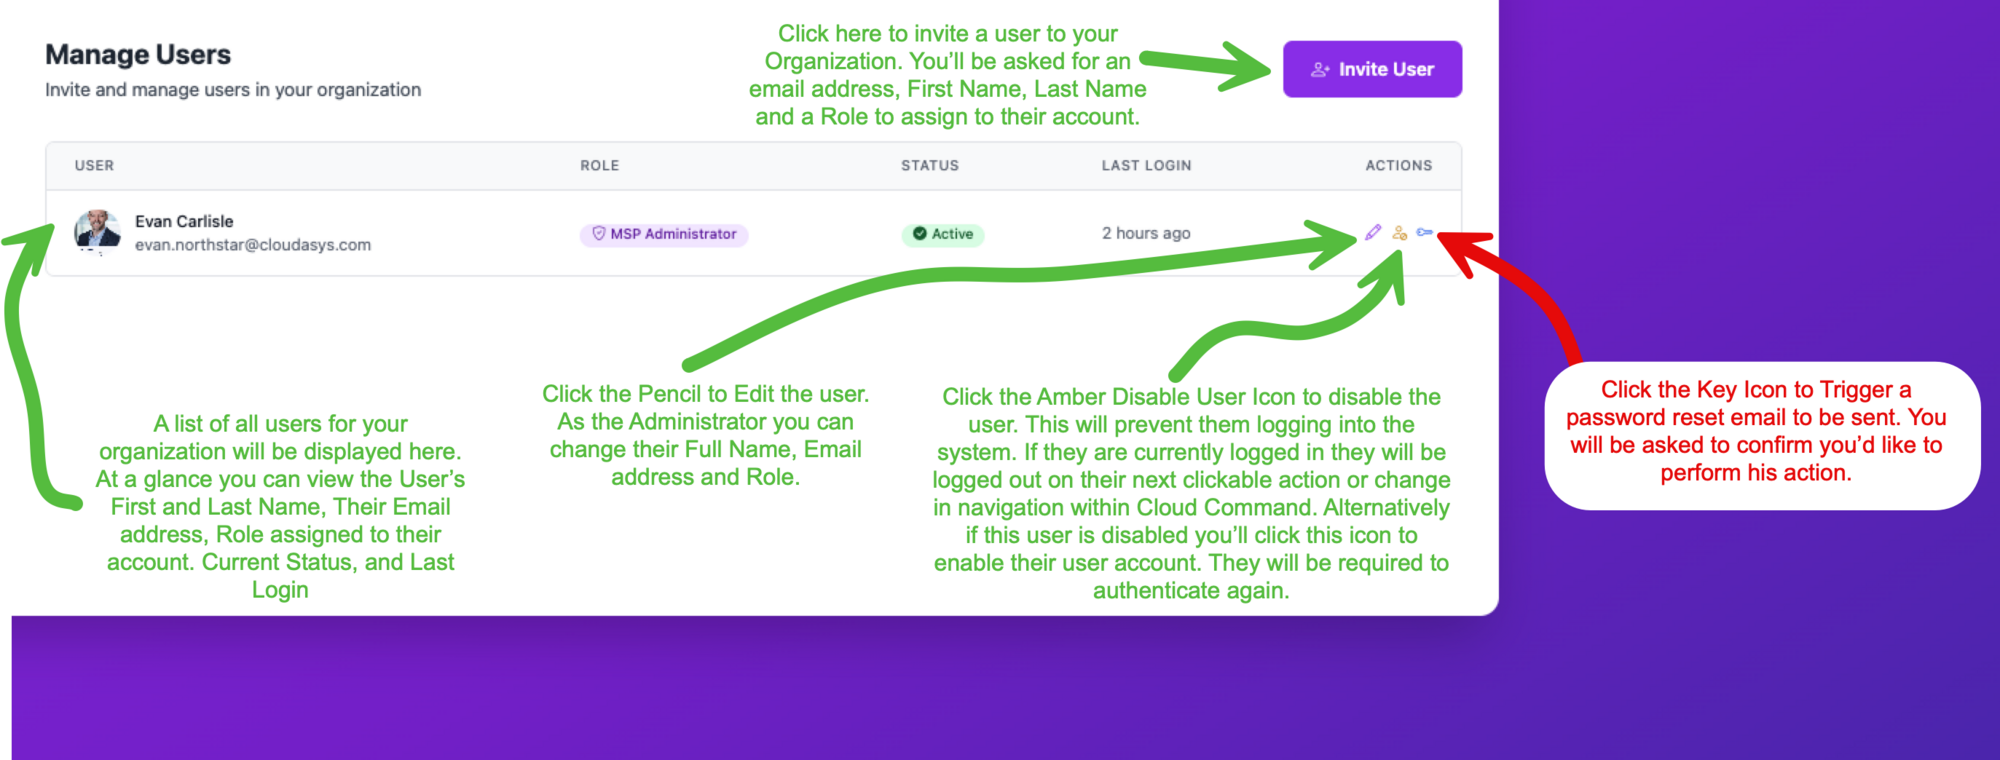
The user table displays each person's name, email, assigned role, current status (Active or Disabled), and their last login time. The action icons on the right let you edit, disable/enable, or send a password reset email for each user.
Inviting a New User
Click the Invite User button to add someone to your organization.
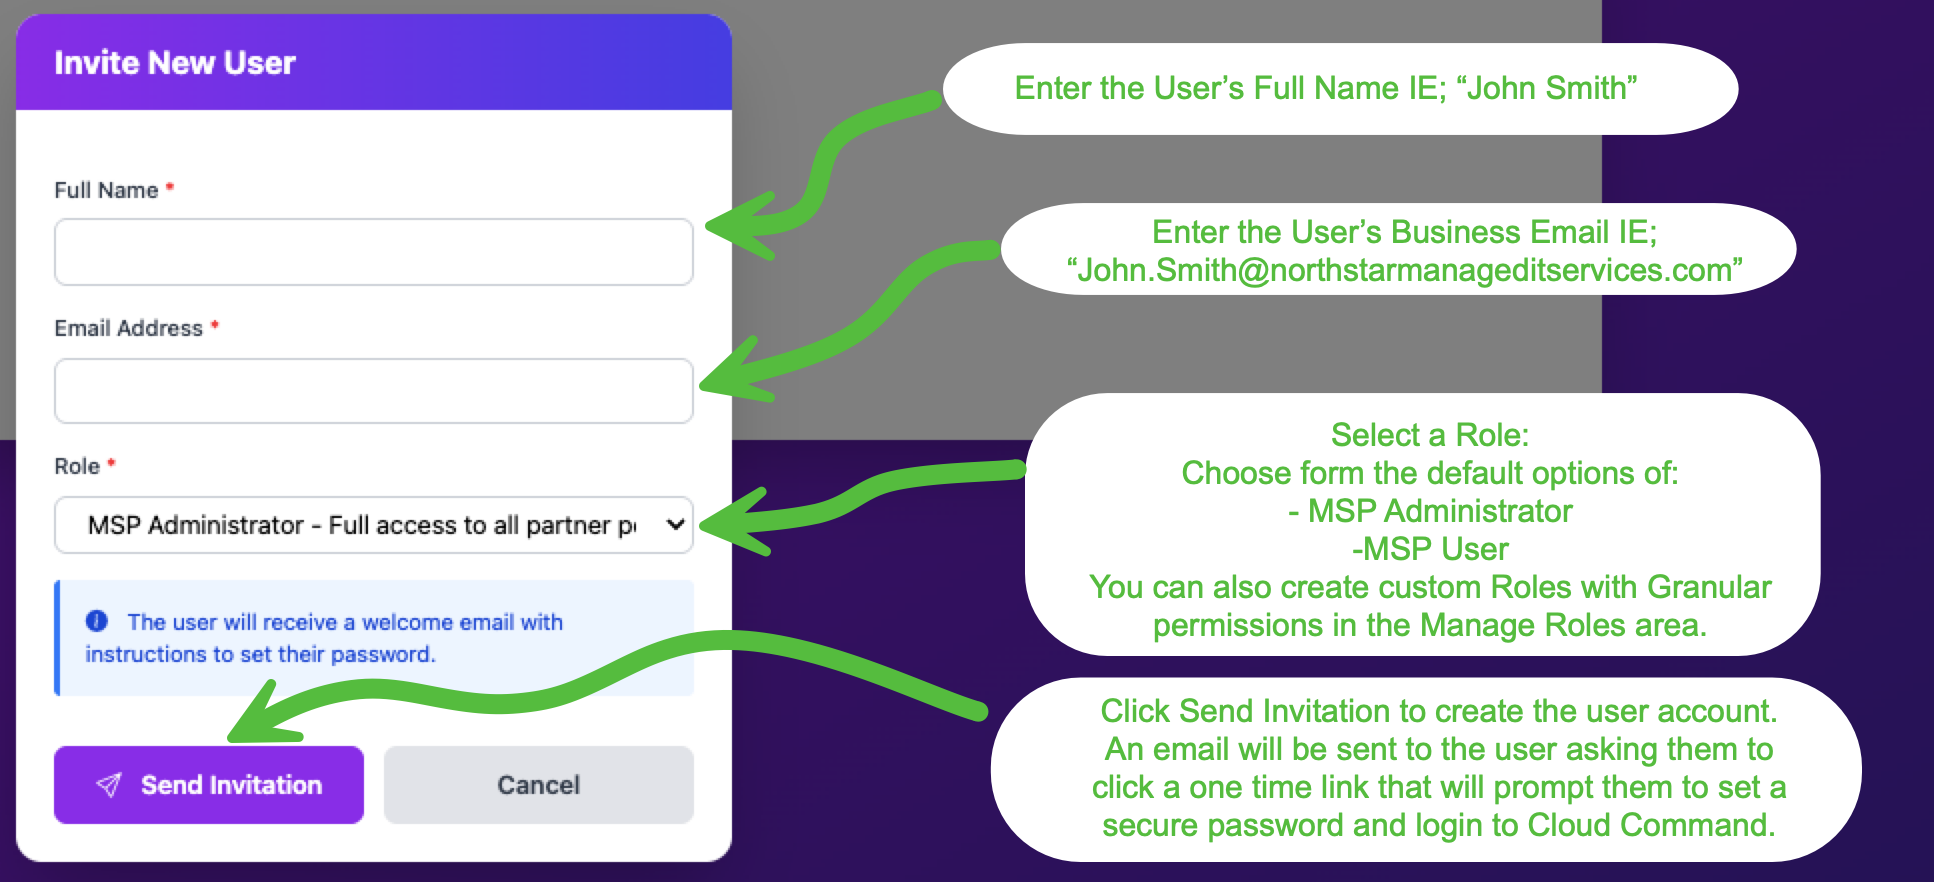
Enter the user's full name, their business email address, and select a role. The default options are MSP Administrator (full access) and MSP User (limited access). You can also assign custom roles that you've created under Manage Roles.
Click Send Invitation and the user will receive a welcome email with a one-time link to set a secure password and log into Cloud Command.
Editing a User
Click the pencil icon next to any user to edit their details.
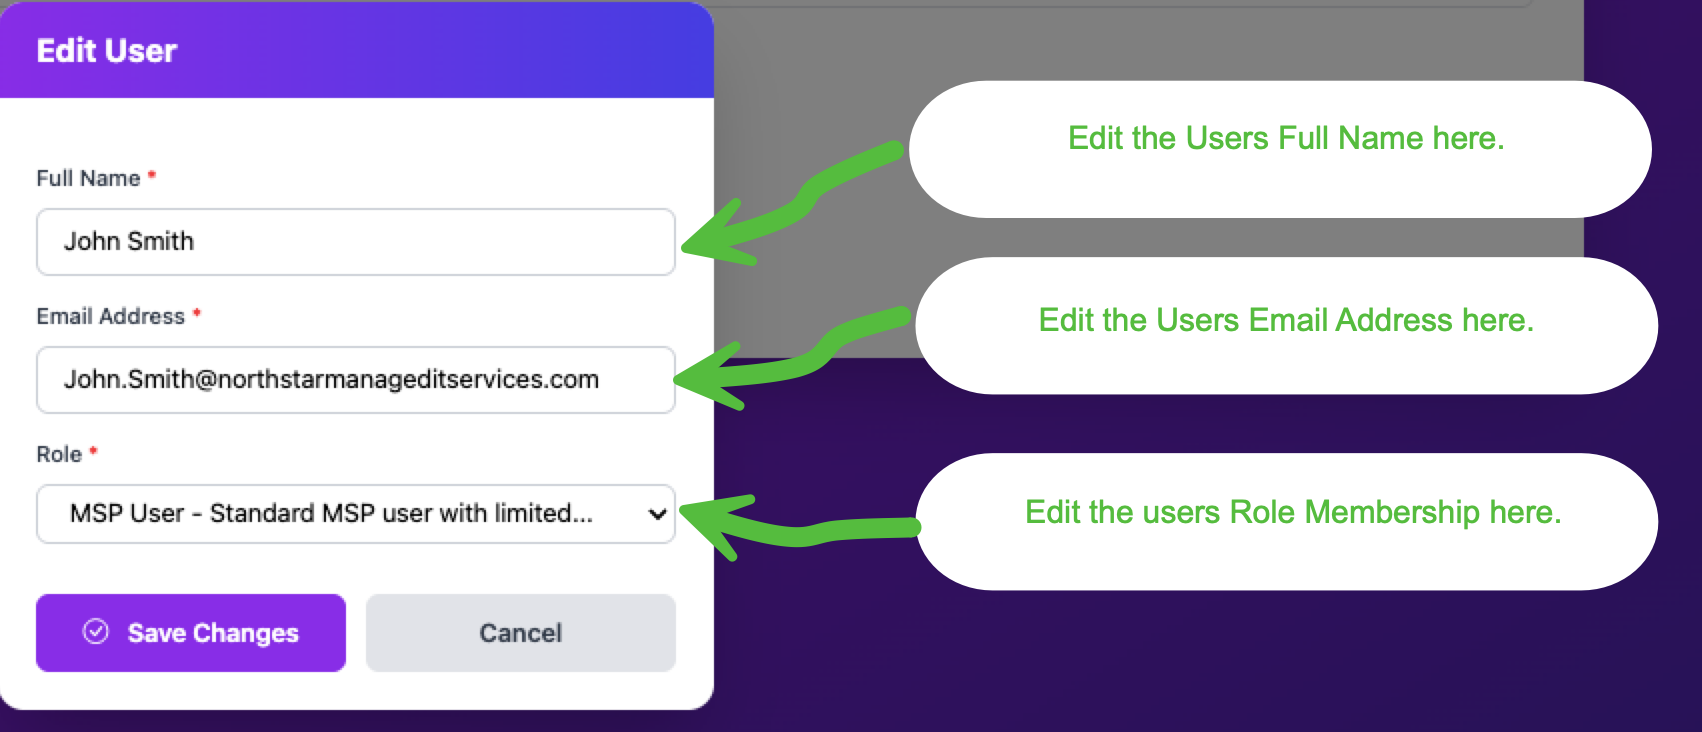
You can update the user's full name, email address, and role assignment. Click Save Changes to apply.
Resetting a User's Password
Click the key icon to send a password reset email to the user.
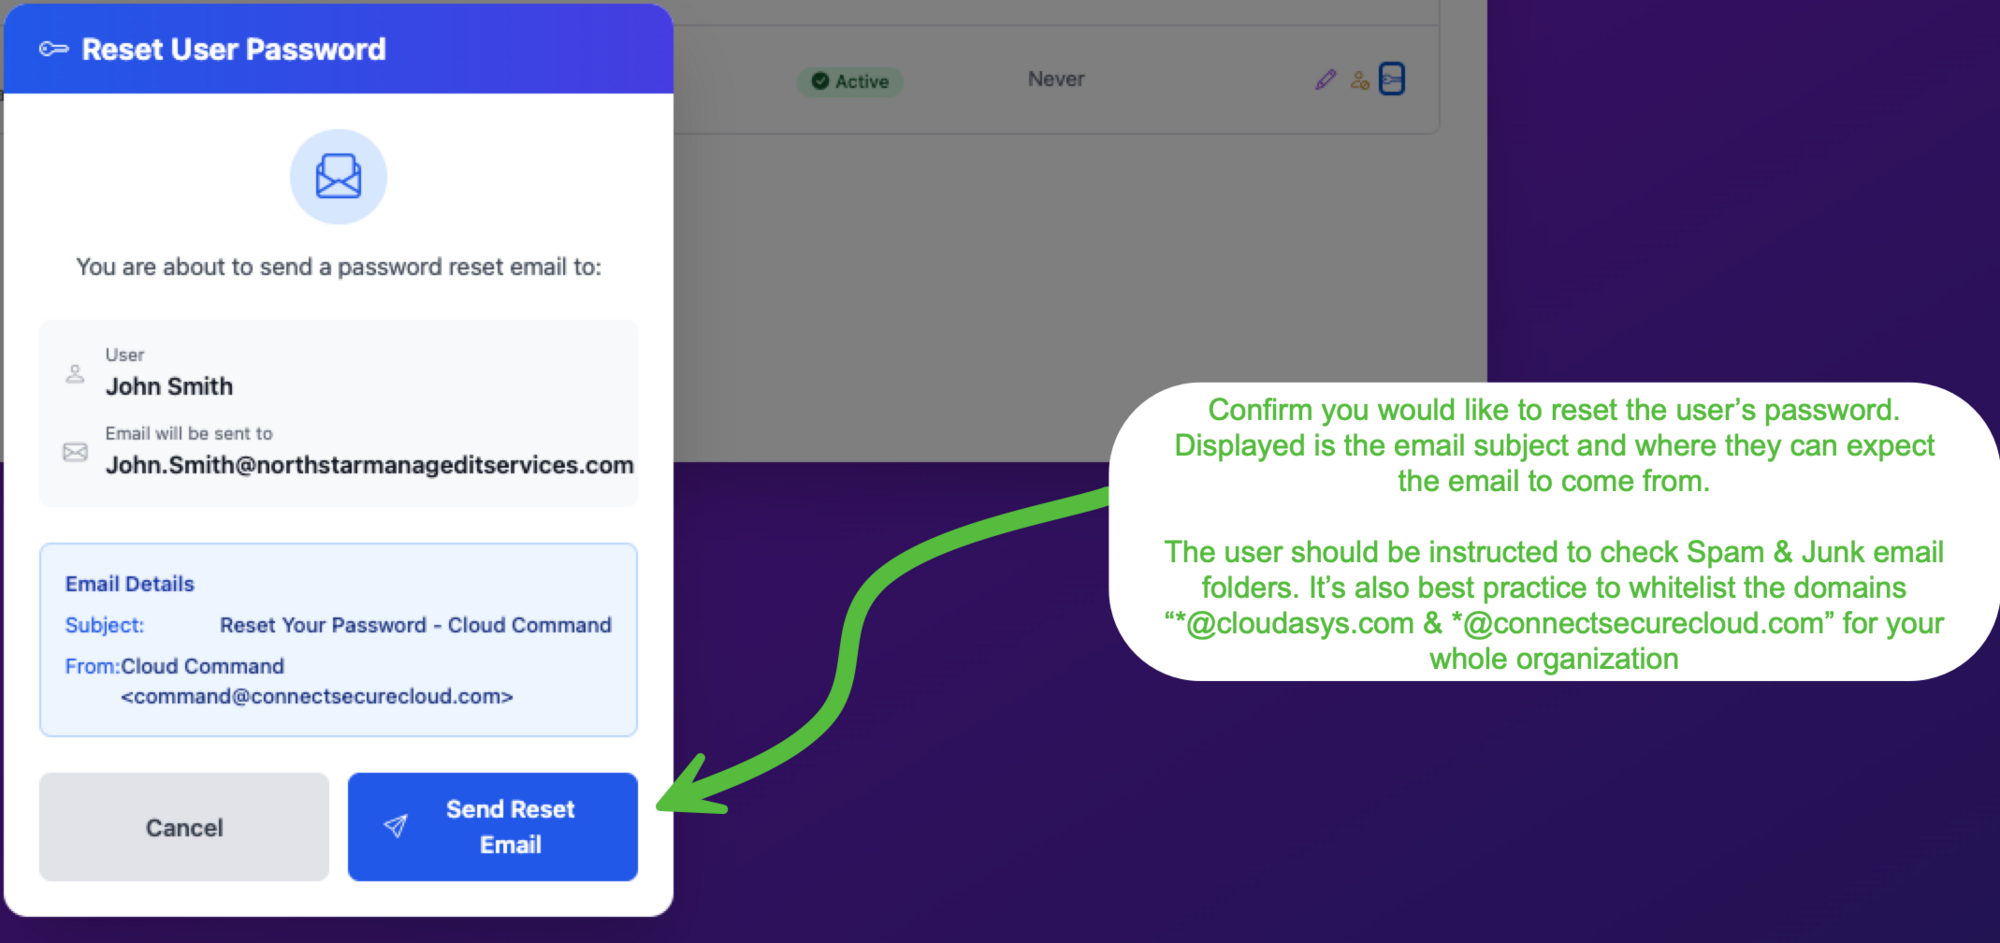
You'll see a confirmation showing exactly where the email will be sent. Click Send Reset Email to proceed. The email will come from Cloud Command with the subject "Reset Your Password - Cloud Command."
@cloudasys.com and @connectsecurecloud.com for your entire organization.Disabling a User
Click the amber user icon to disable a user account.
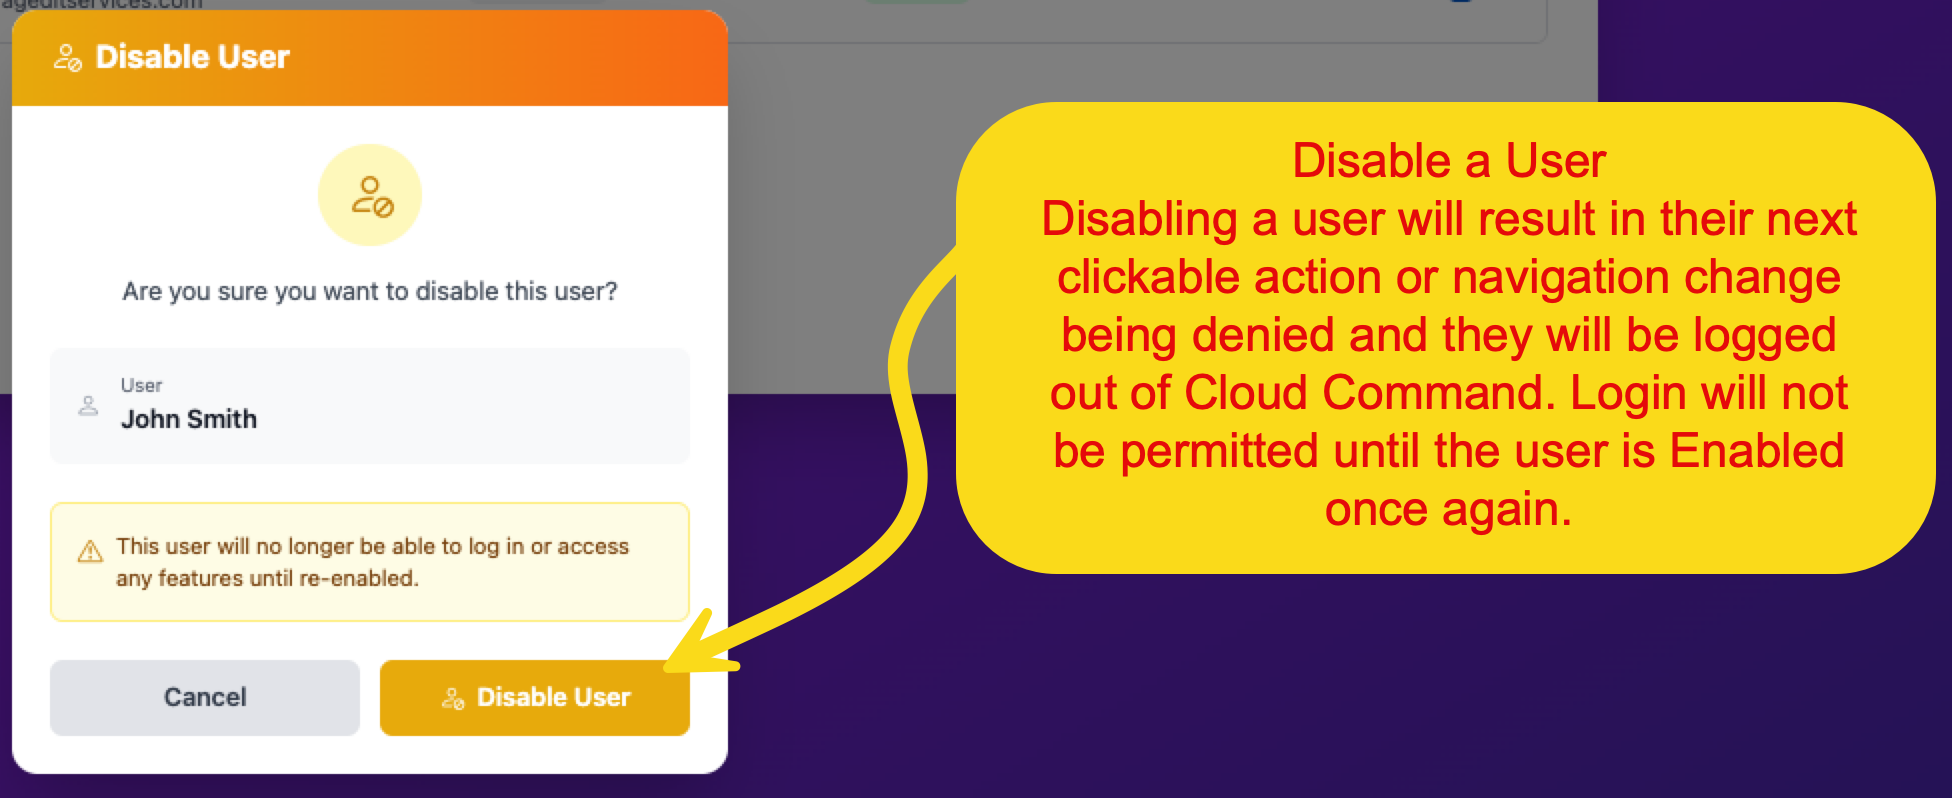
Disabling a user prevents them from logging in. If they are currently logged in, they will be signed out on their next action or navigation change. Login will not be permitted until you re-enable the account.
Enabling a User
If you need to restore access for a previously disabled user, click the same icon (now green) to re-enable them.
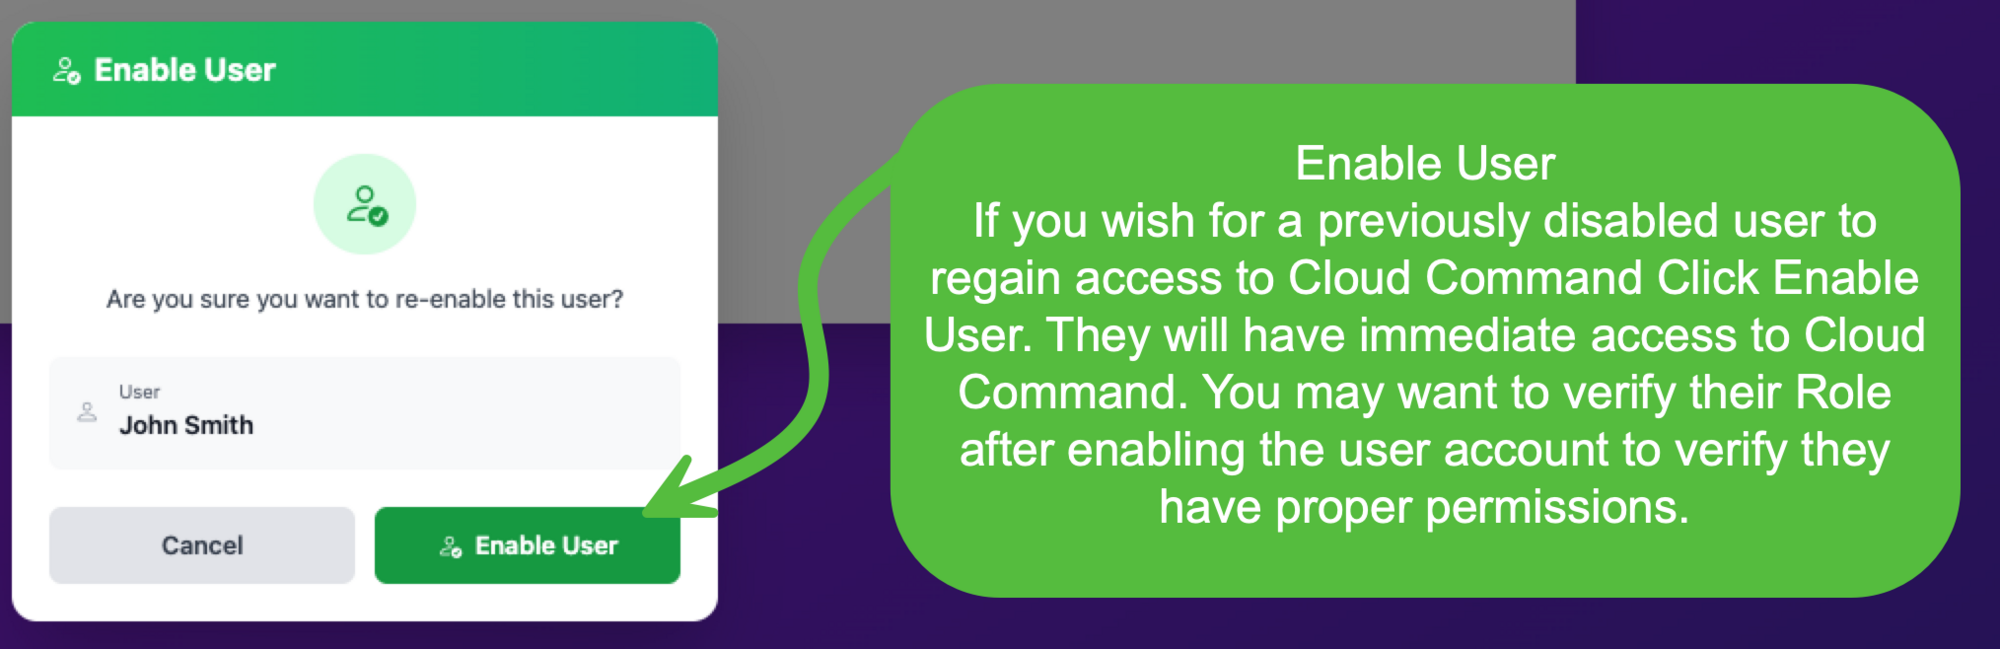
Once enabled, the user will have immediate access to Cloud Command. You may want to verify their role assignment afterward to ensure they have the correct permissions.
Manage Roles
Roles control what each user in your organization can see and do inside Cloud Command. The Manage Roles page lets you view, create, duplicate, and manage roles with granular permissions.
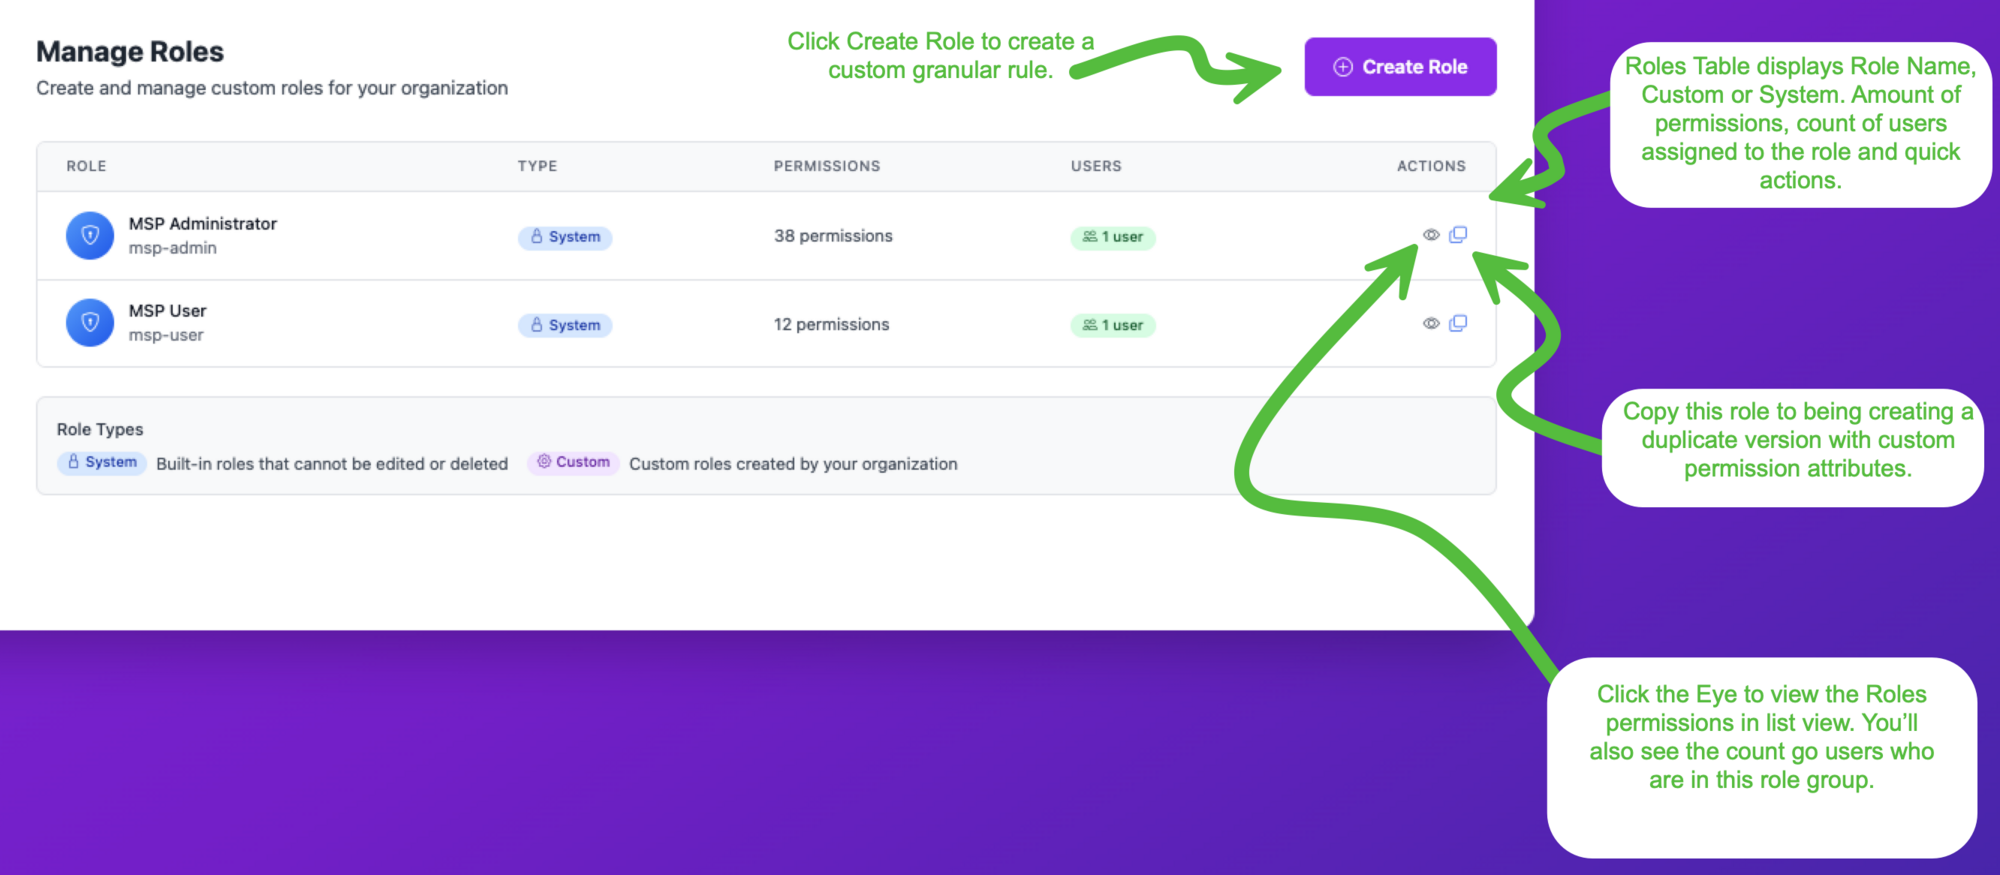
Your account comes with two built-in System roles:
- MSP Administrator Full access to all partner portal features (38 permissions).
- MSP User Standard access with limited permissions (12 permissions).
System roles cannot be edited or deleted. To customize permissions, create a Custom role.
Viewing Role Details
Click the eye icon next to any role to see its full list of permissions and user count.
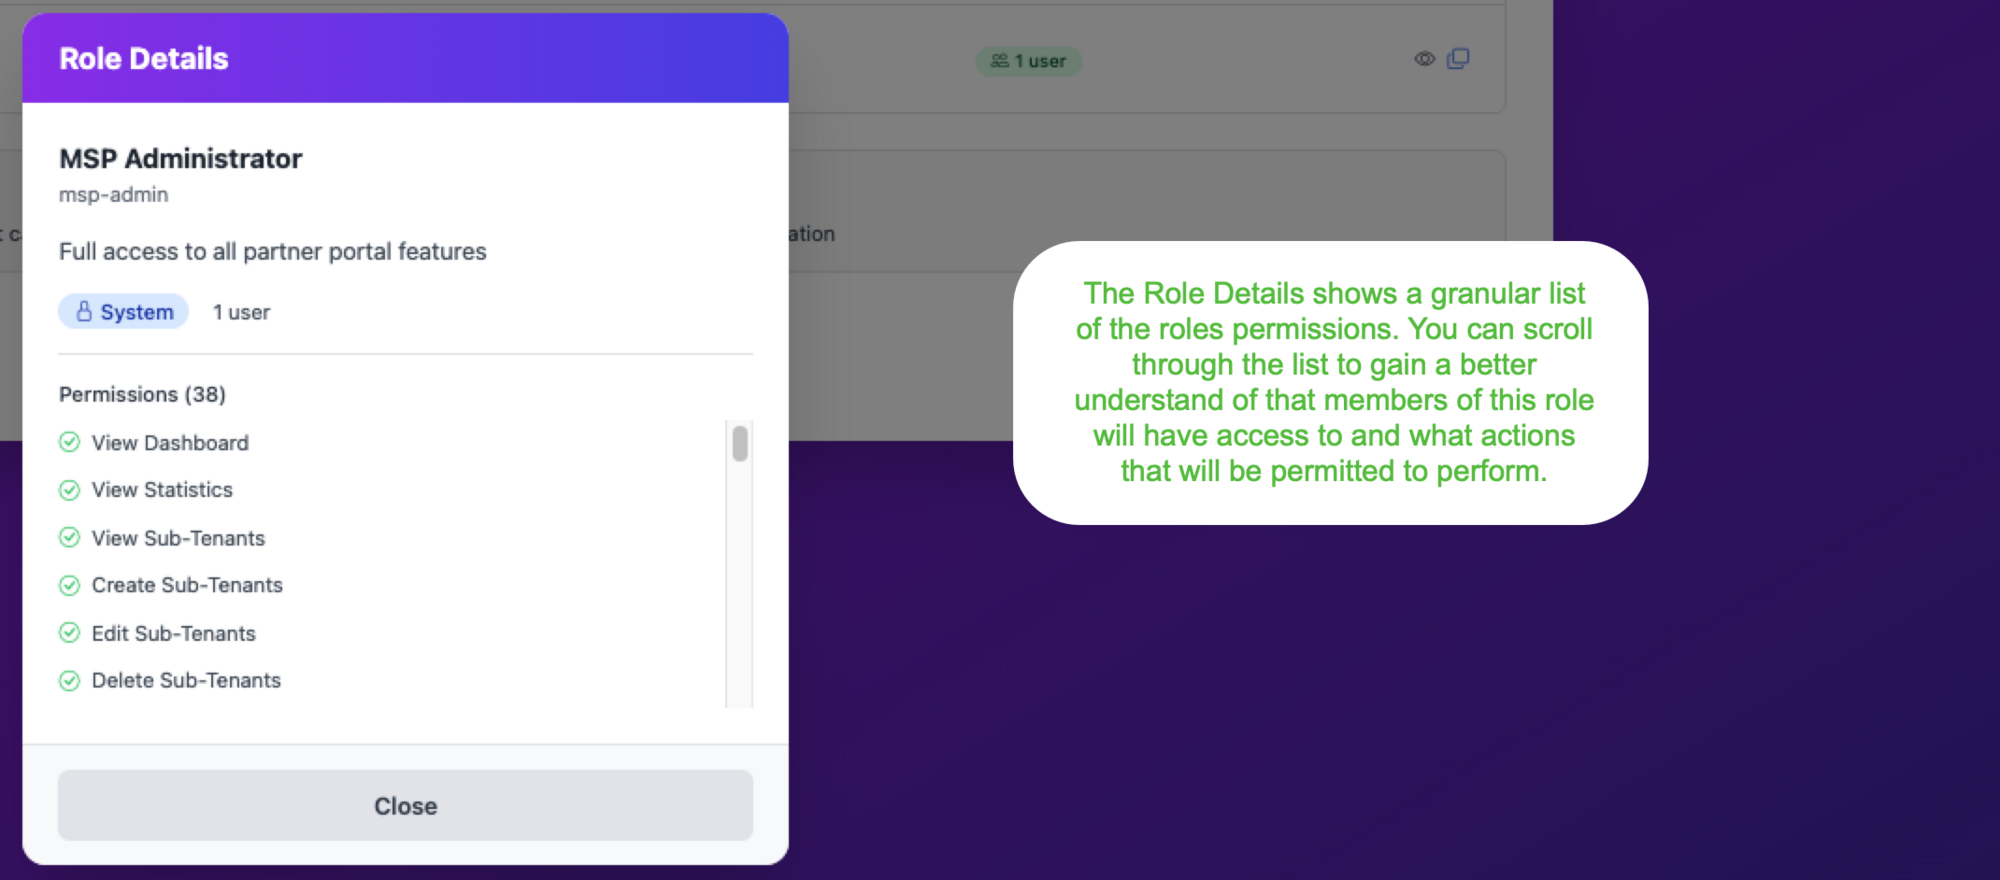
Scroll through the permissions list to understand exactly what members of that role can access and which actions they're allowed to perform.
Creating a New Role
Click Create Role to build a custom role from scratch.
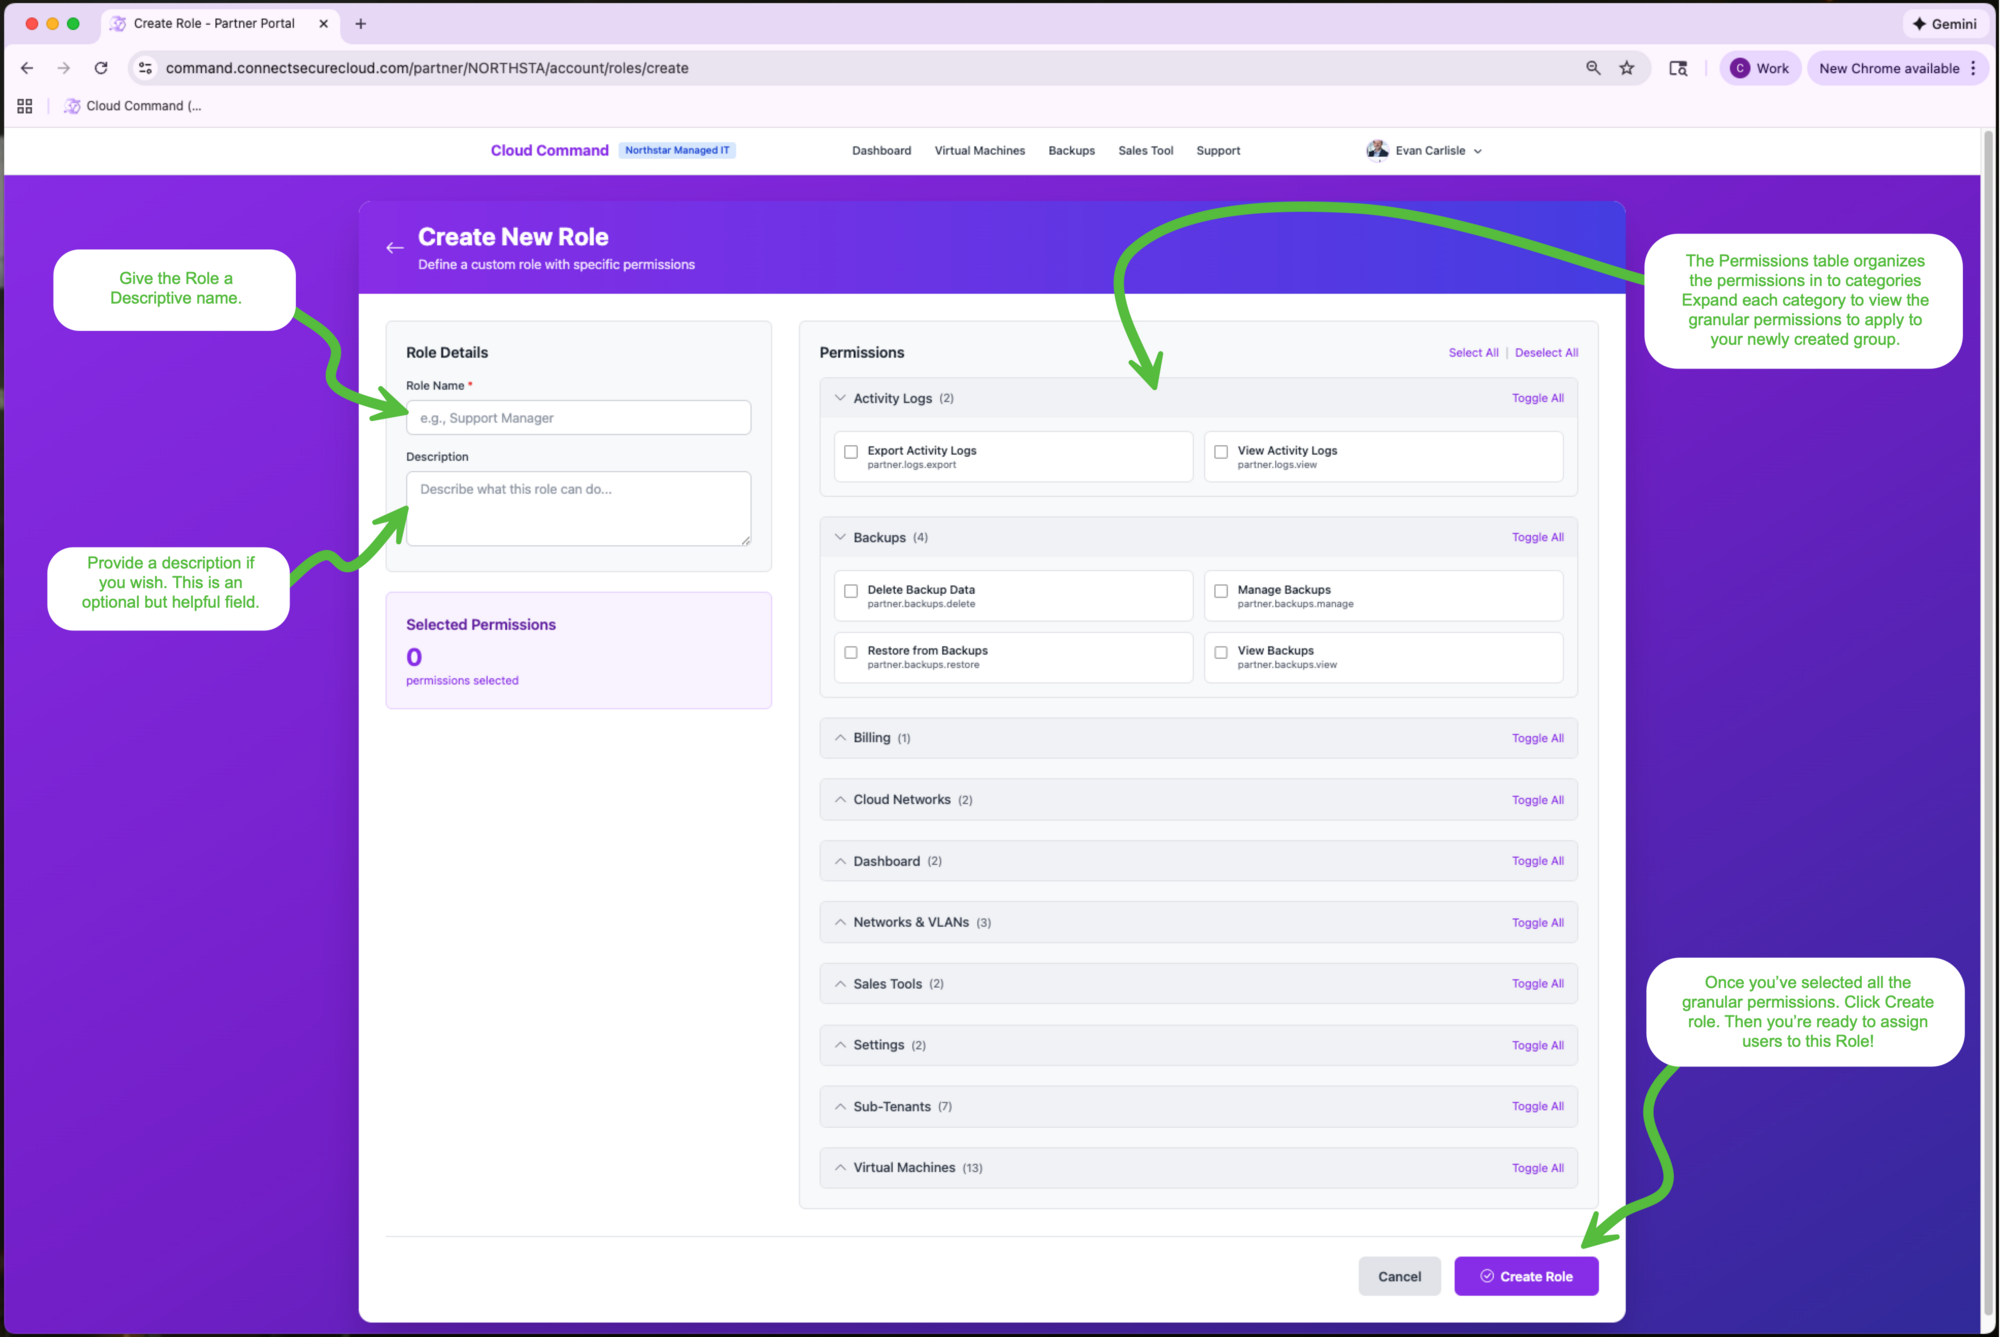
Give the role a descriptive name and an optional description. On the right side, permissions are organized into categories such as Activity Logs, Backups, Billing, Cloud Networks, Dashboard, Networks & VLANs, Sales Tools, Settings, Sub-Tenants, and Virtual Machines. Expand each category to select individual permissions, or use Toggle All to select everything in a category.
Once you've selected the permissions you need, click Create Role. You can then assign users to this role from the Manage Users page.
Managing Custom Roles
Custom roles (marked with a green Custom badge) have additional actions compared to System roles.
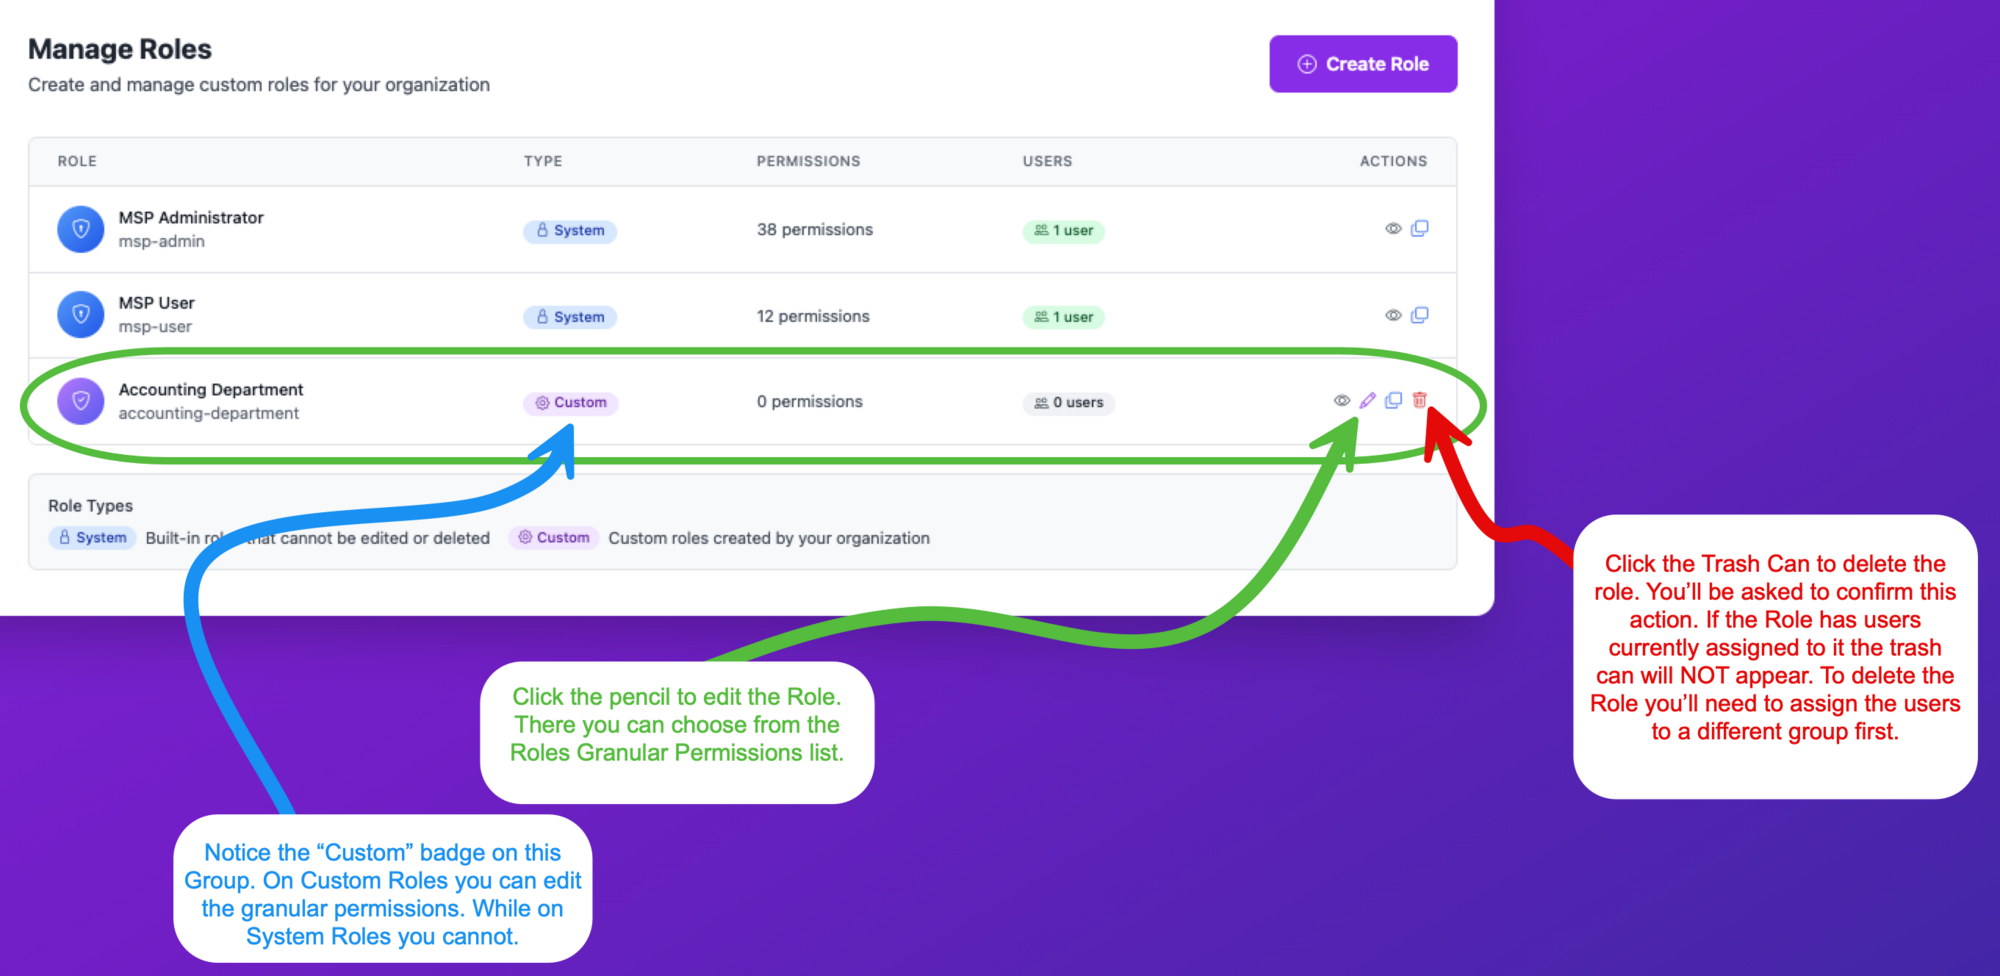
- Edit (pencil icon) Modify the role's granular permissions at any time.
- Duplicate (copy icon) Create a copy of the role as a starting point for a new one.
- Delete (trash icon) Remove the role. This option only appears when no users are currently assigned to it. To delete a role with users, reassign those users to a different role first.
Duplicating a Role
The Duplicate feature is a quick way to create a new role based on an existing one.
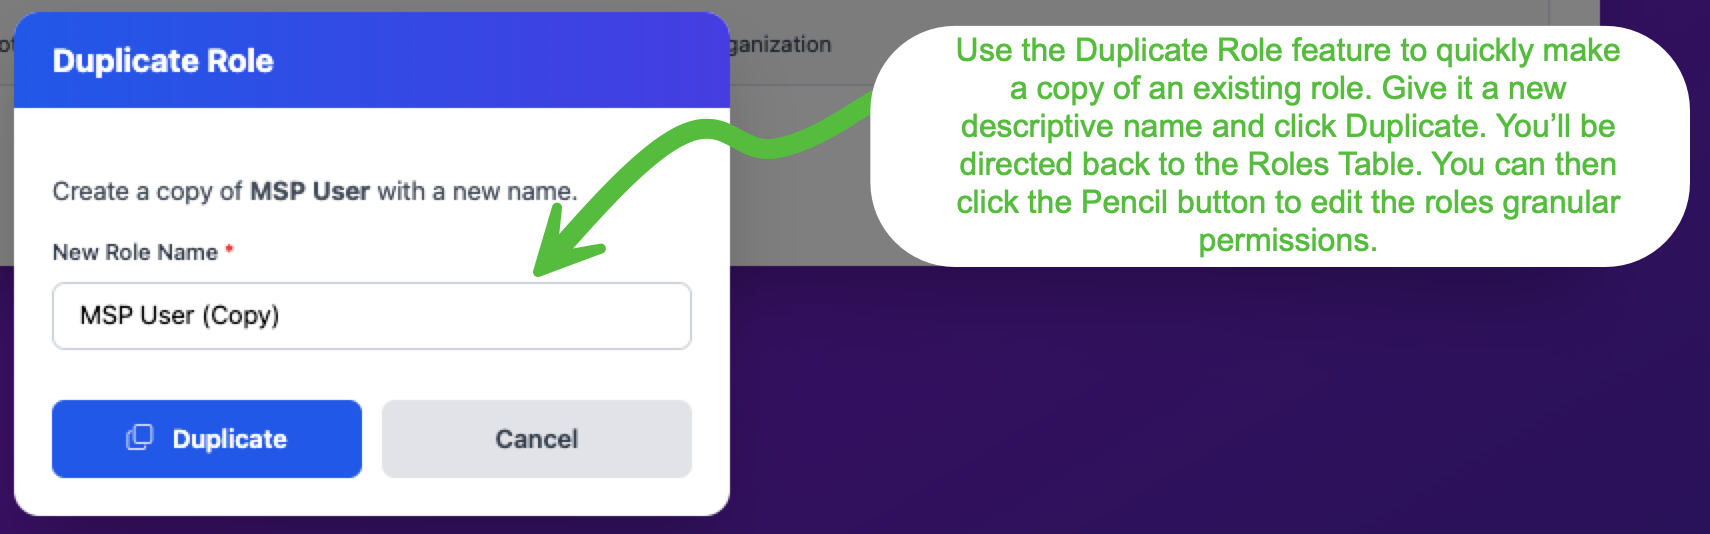
Enter a new descriptive name and click Duplicate. You'll be taken back to the Roles table where you can click the pencil icon to fine-tune the duplicated role's permissions.
Activity Logs
Activity Logs give you a complete audit trail of everything happening in your organization. Every user login, VM deployment, billing change, security event, and account modification is tracked here.
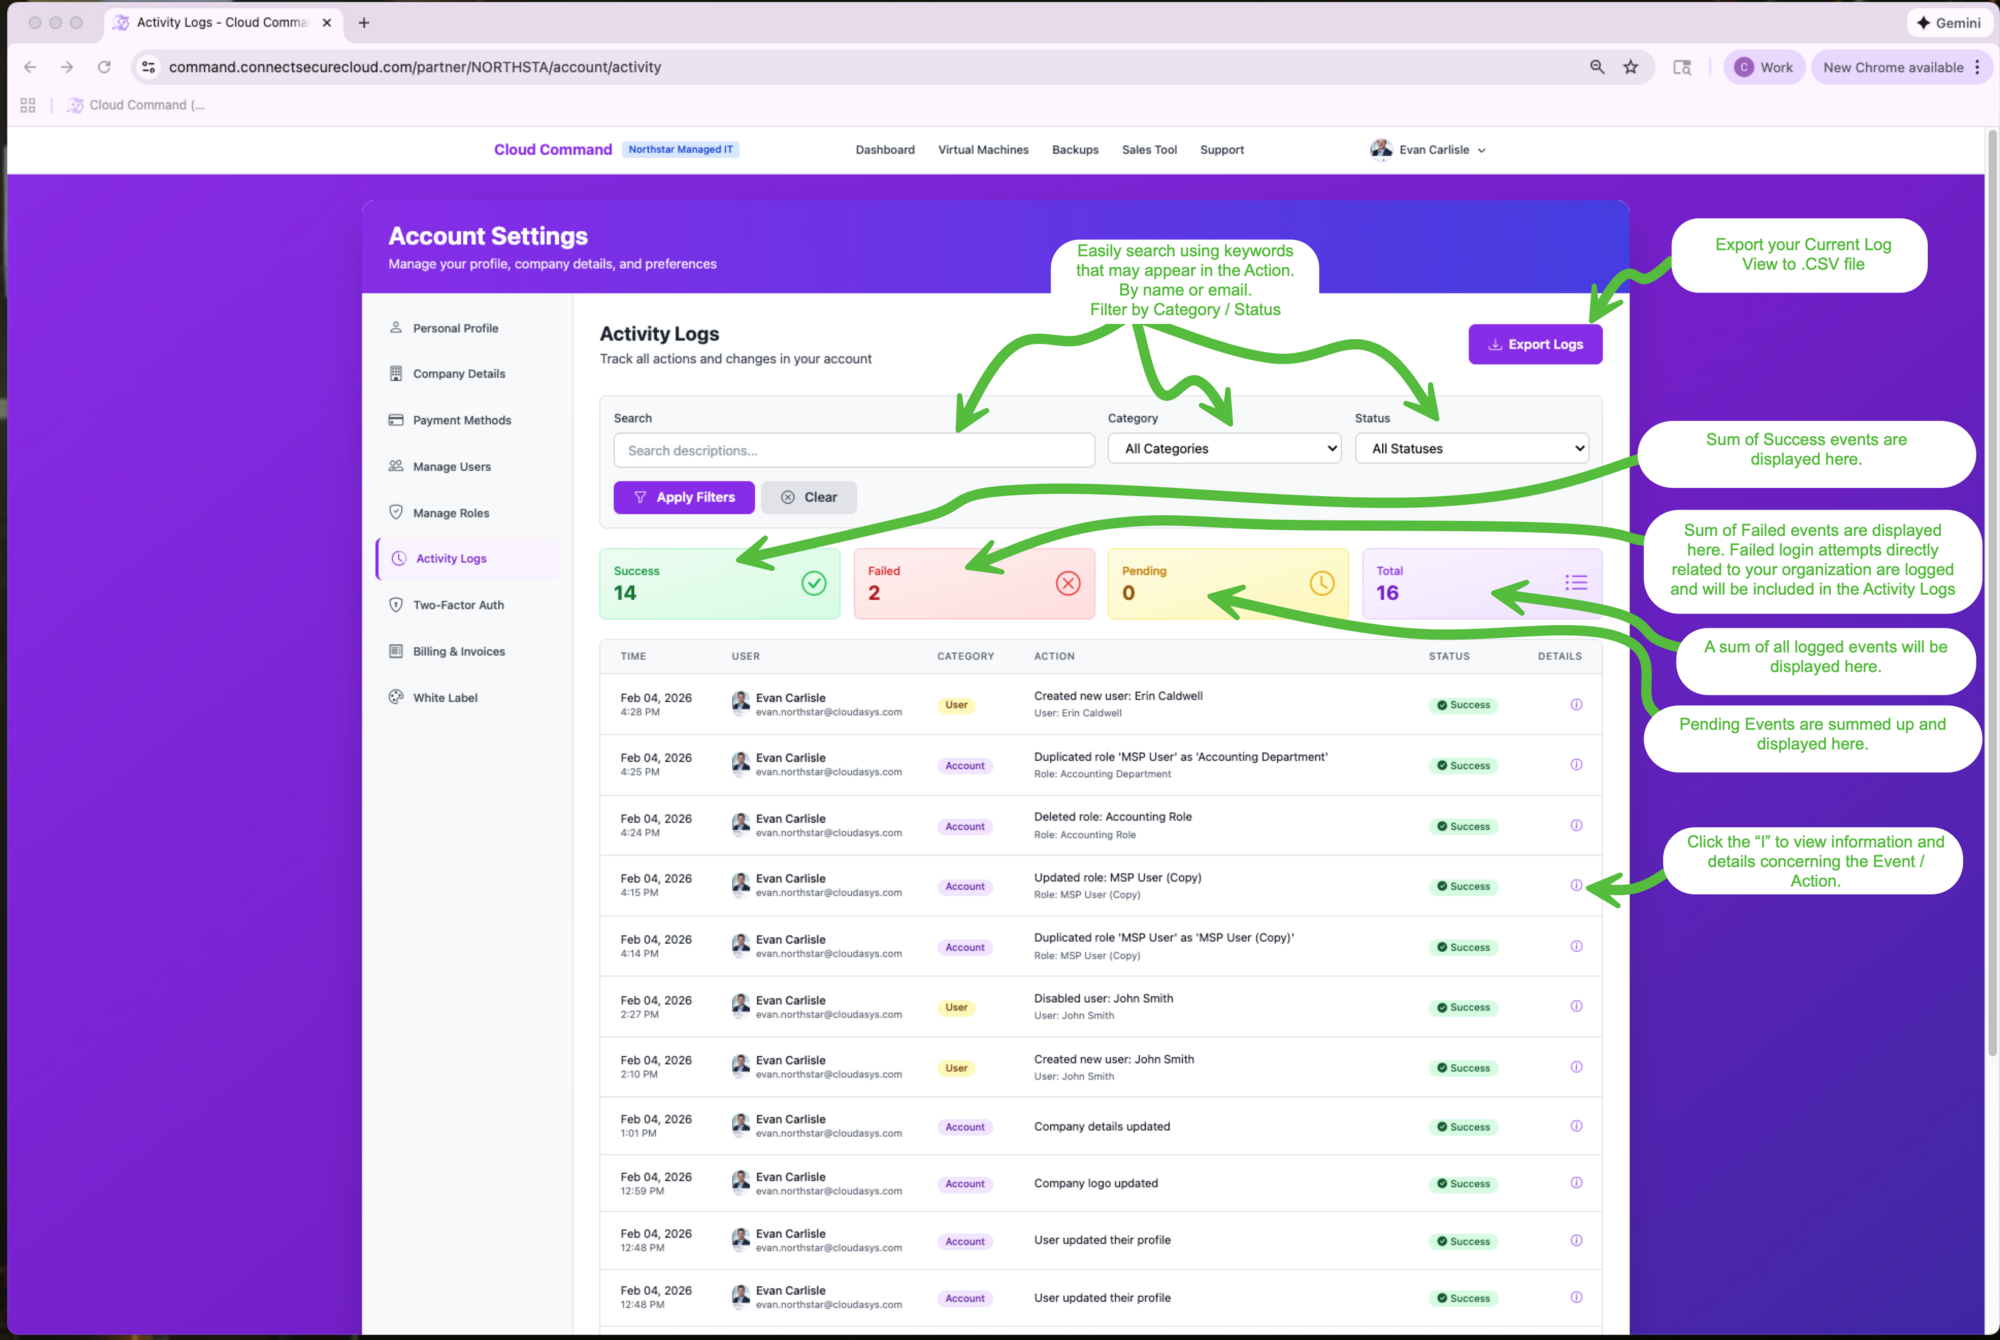
At the top of the page, you'll see summary cards showing the count of Success, Failed, and Pending events along with the total. Use the search bar to find events by keyword, or filter by Category and Status using the dropdown menus. Click Apply Filters to narrow your results, or Clear to reset.
You can also export your current log view to a CSV file by clicking Export Logs.
Viewing Event Details
Click the info icon on any event row to see the full details.
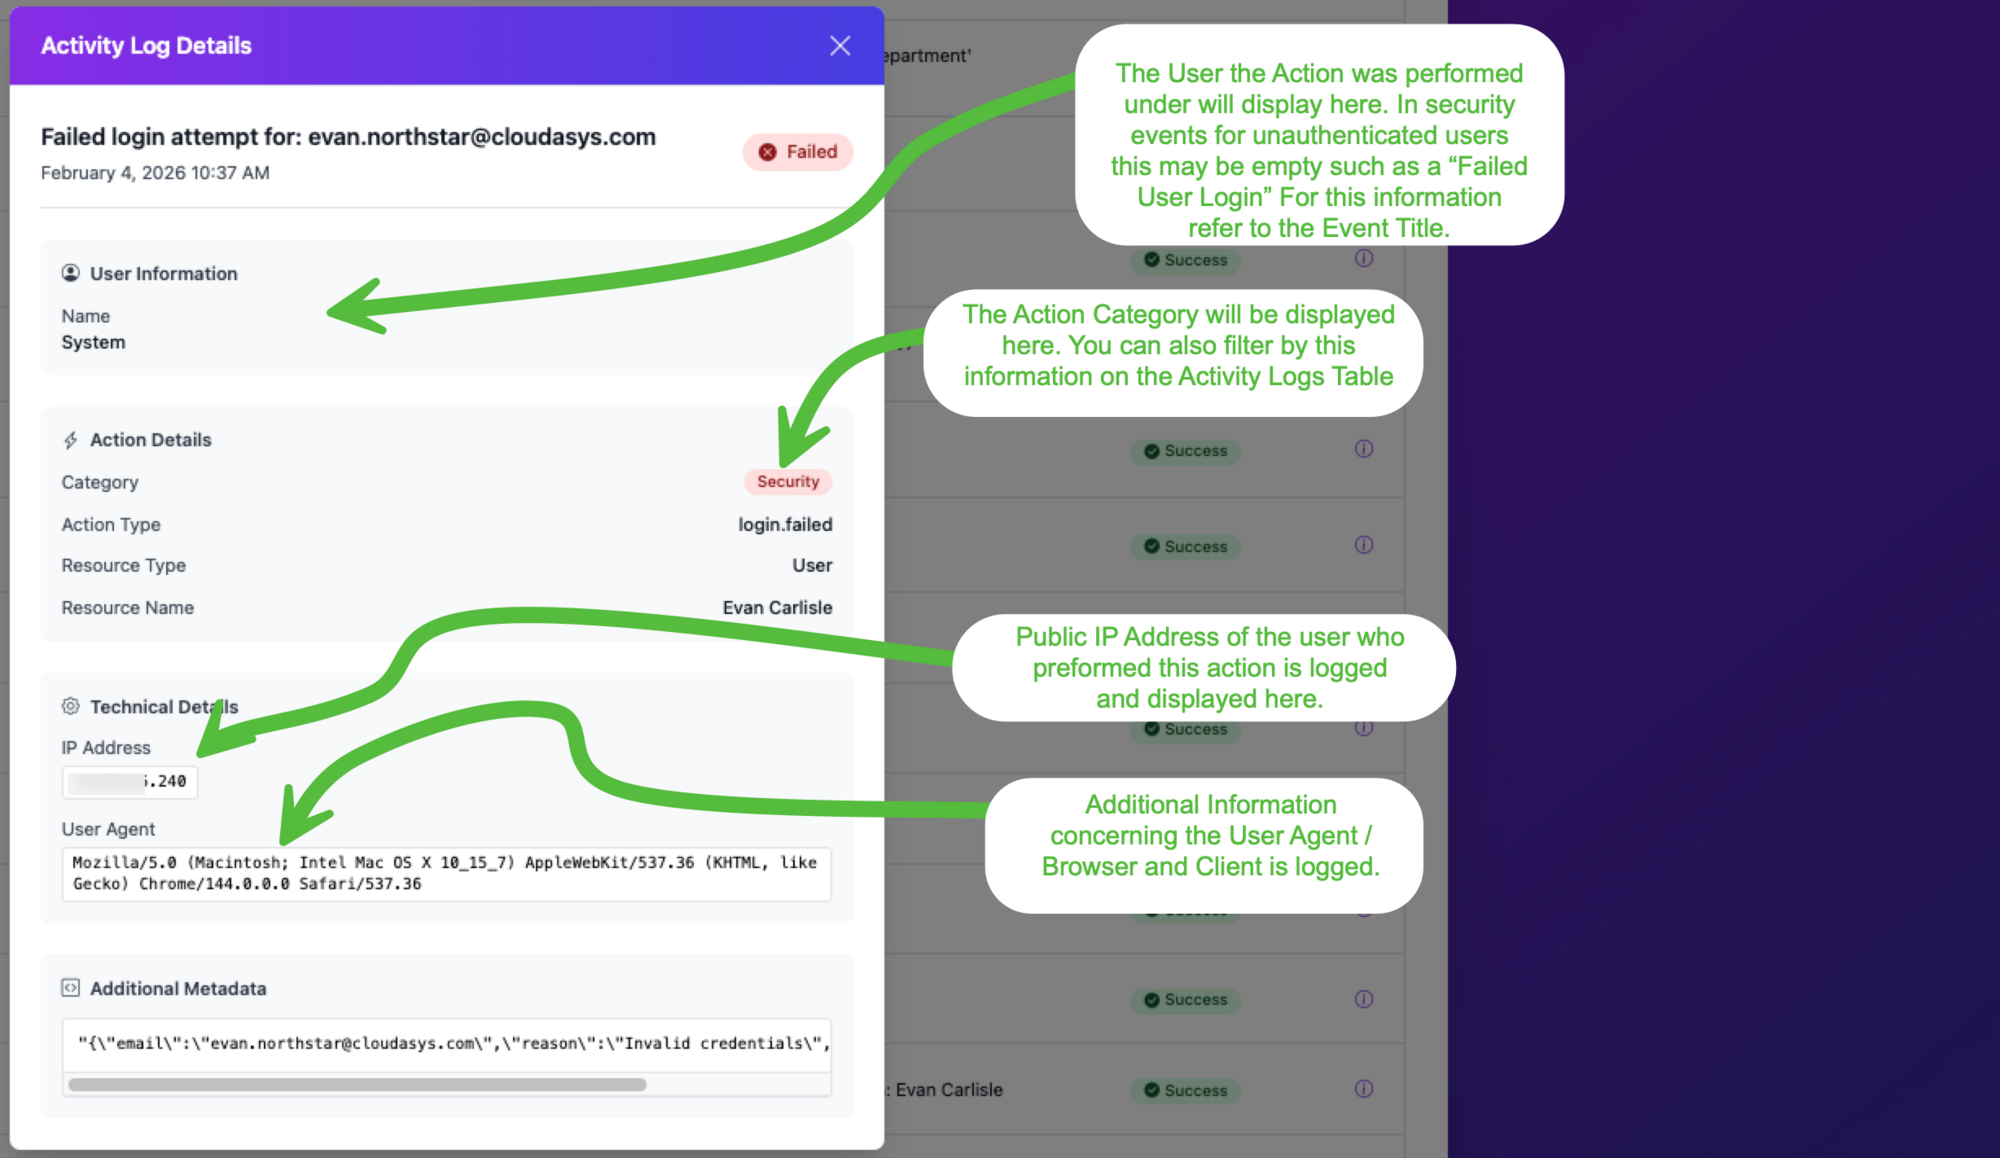
The detail view includes:
- User Information Which user performed the action. For security events involving unauthenticated users (such as failed logins), this may show "System" instead.
- Action Details The category, action type, resource type, and resource name associated with the event.
- Technical Details The public IP address and browser/user agent of the person who triggered the event.
- Additional Metadata Raw data related to the event, useful for troubleshooting.
Two-Factor Authentication
Two-factor authentication (2FA) adds an extra layer of security to your account by requiring a code from your phone in addition to your password.
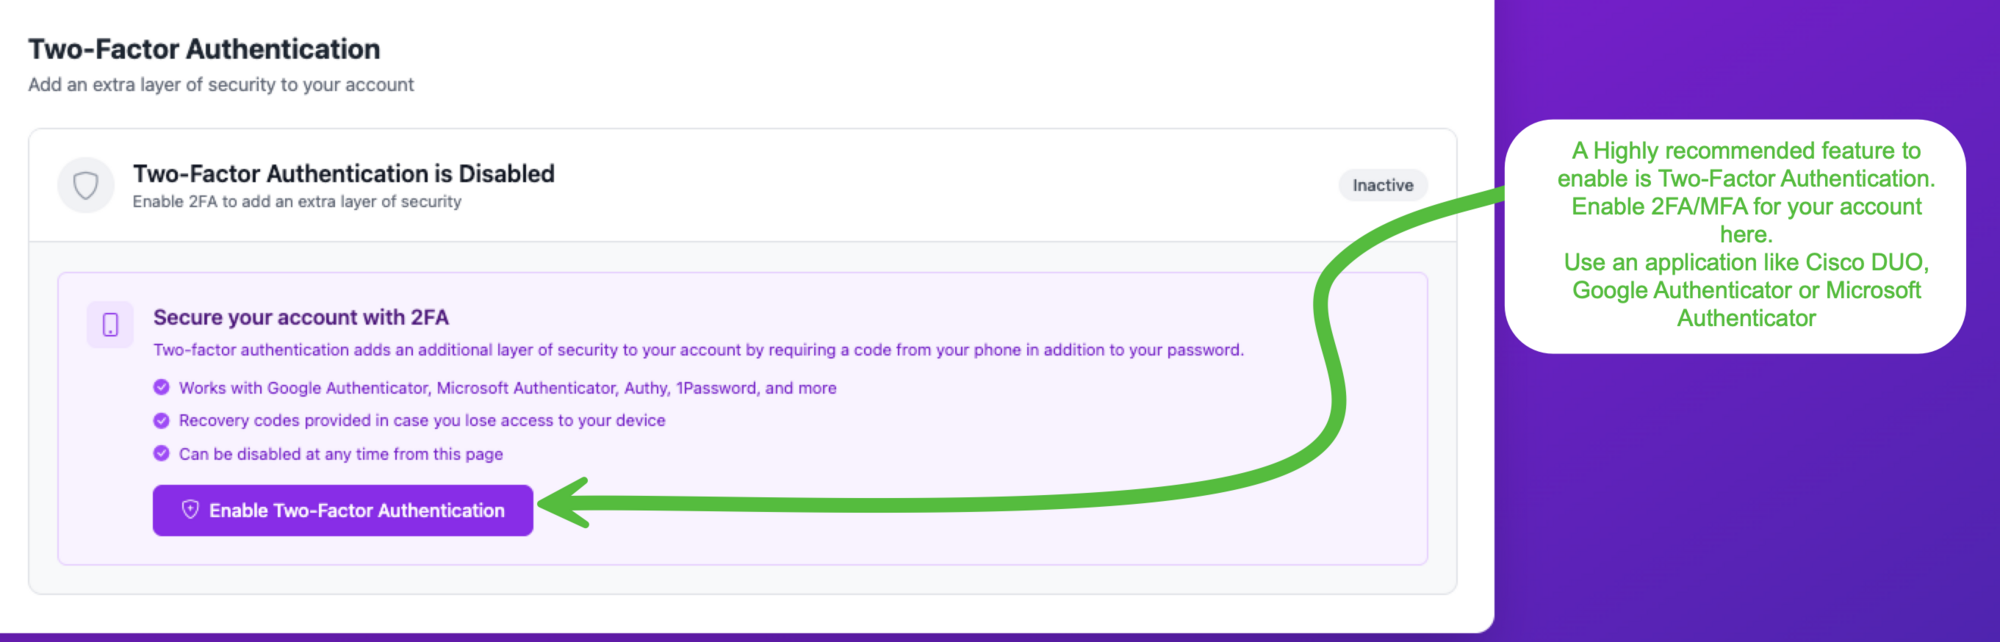
We strongly recommend enabling 2FA on every user account. Cloud Command works with popular authenticator apps including Google Authenticator, Microsoft Authenticator, Cisco DUO, Authy, 1Password, and more.
Key features of 2FA in Cloud Command:
- Recovery codes are provided in case you lose access to your device.
- 2FA can be disabled at any time from this page.
- Once enabled, you'll be prompted for a code each time you log in.
Click Enable Two-Factor Authentication to get started. You'll be guided through scanning a QR code with your authenticator app and entering a verification code to confirm setup.
Billing and Invoices
The Billing & Invoices page gives you a complete view of your account's financial activity.
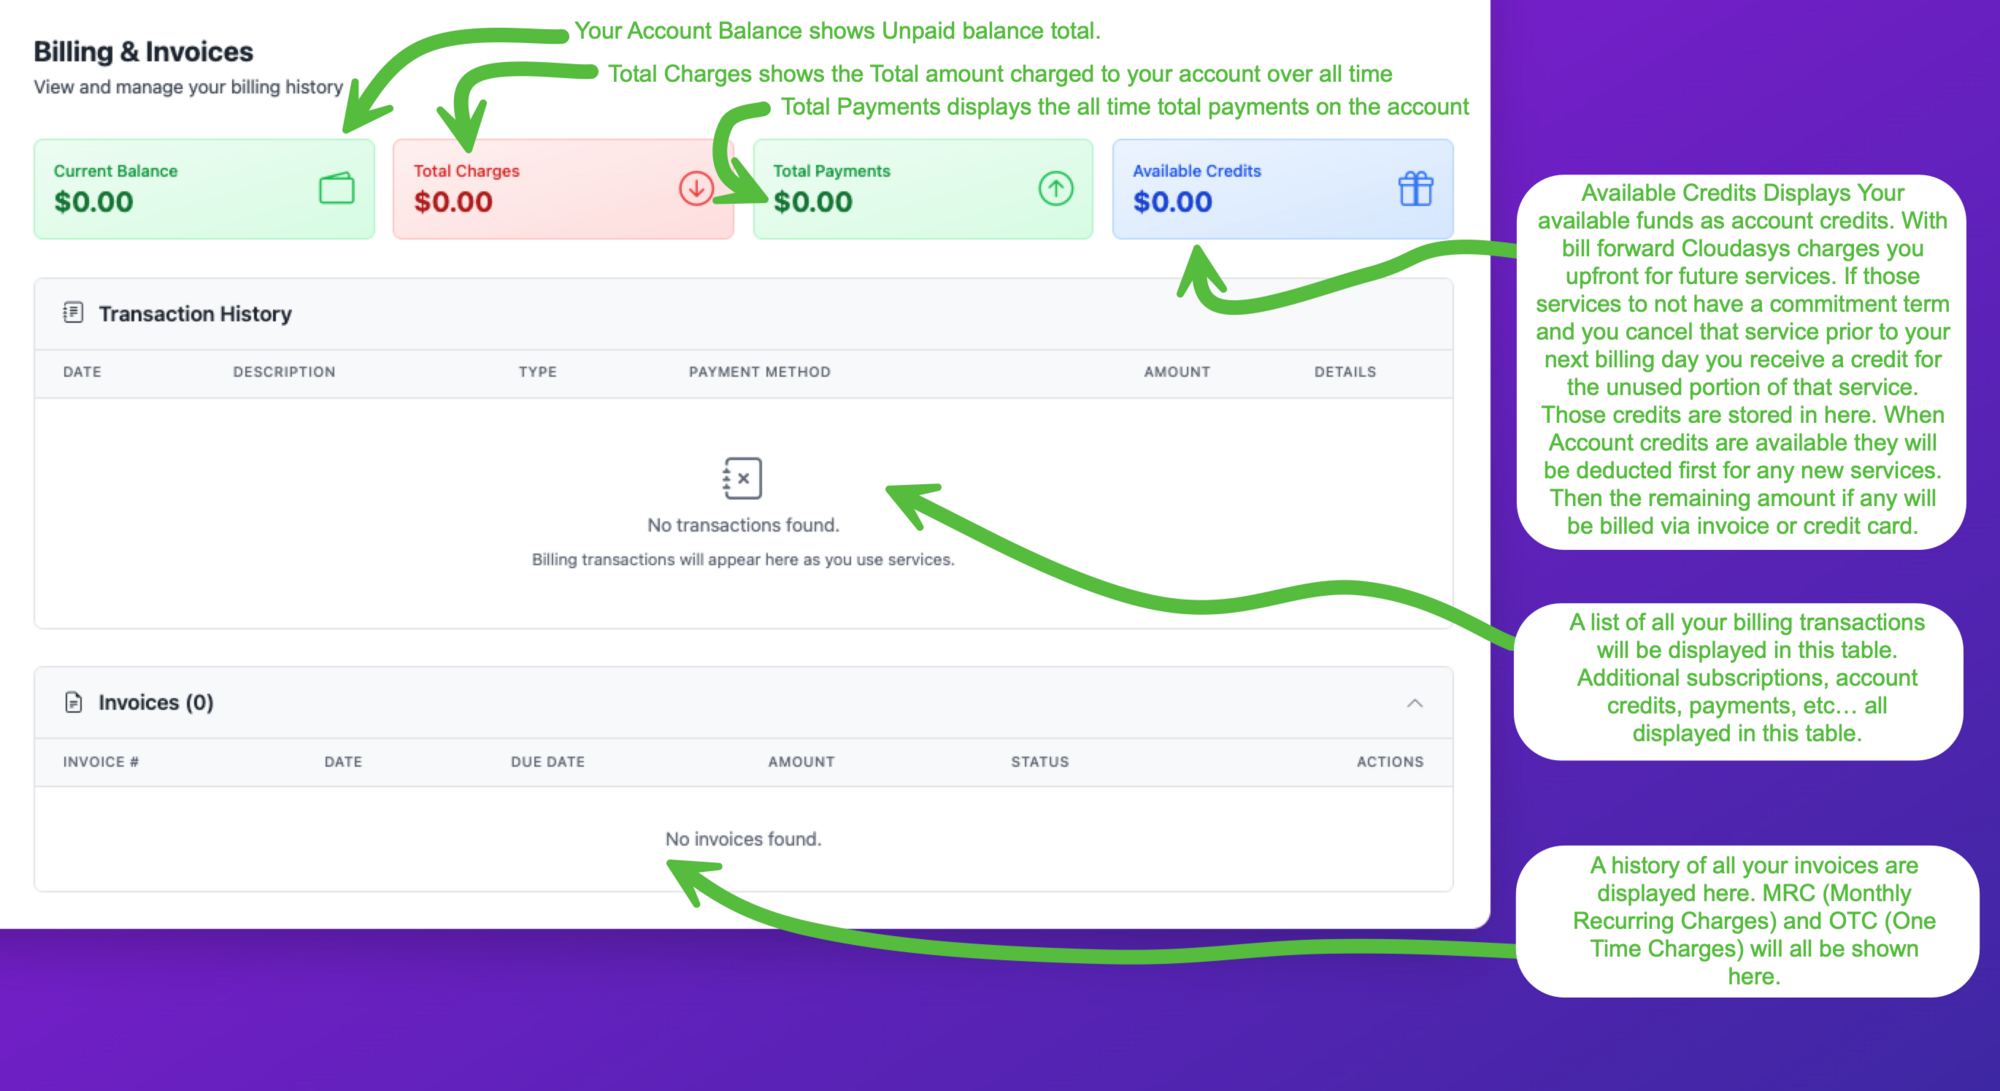
At the top, four summary cards show your:
- Current Balance Your unpaid balance total.
- Total Charges The total amount charged to your account over all time.
- Total Payments The total payments made on the account.
- Available Credits Your available funds as account credits. When credits are available, they are applied to new charges before billing your credit card or creating an invoice line item.
Transaction History
All billing transactions appear here as they occur, including subscriptions, account credits, payments, and one-time charges.
Invoices
A history of all your invoices is displayed in this section. Monthly recurring charges (MRC) and one-time charges (OTC) are both included.
White Label Settings
White Label branding lets your customers see your company name and logo instead of Cloud Command when they access their portal.
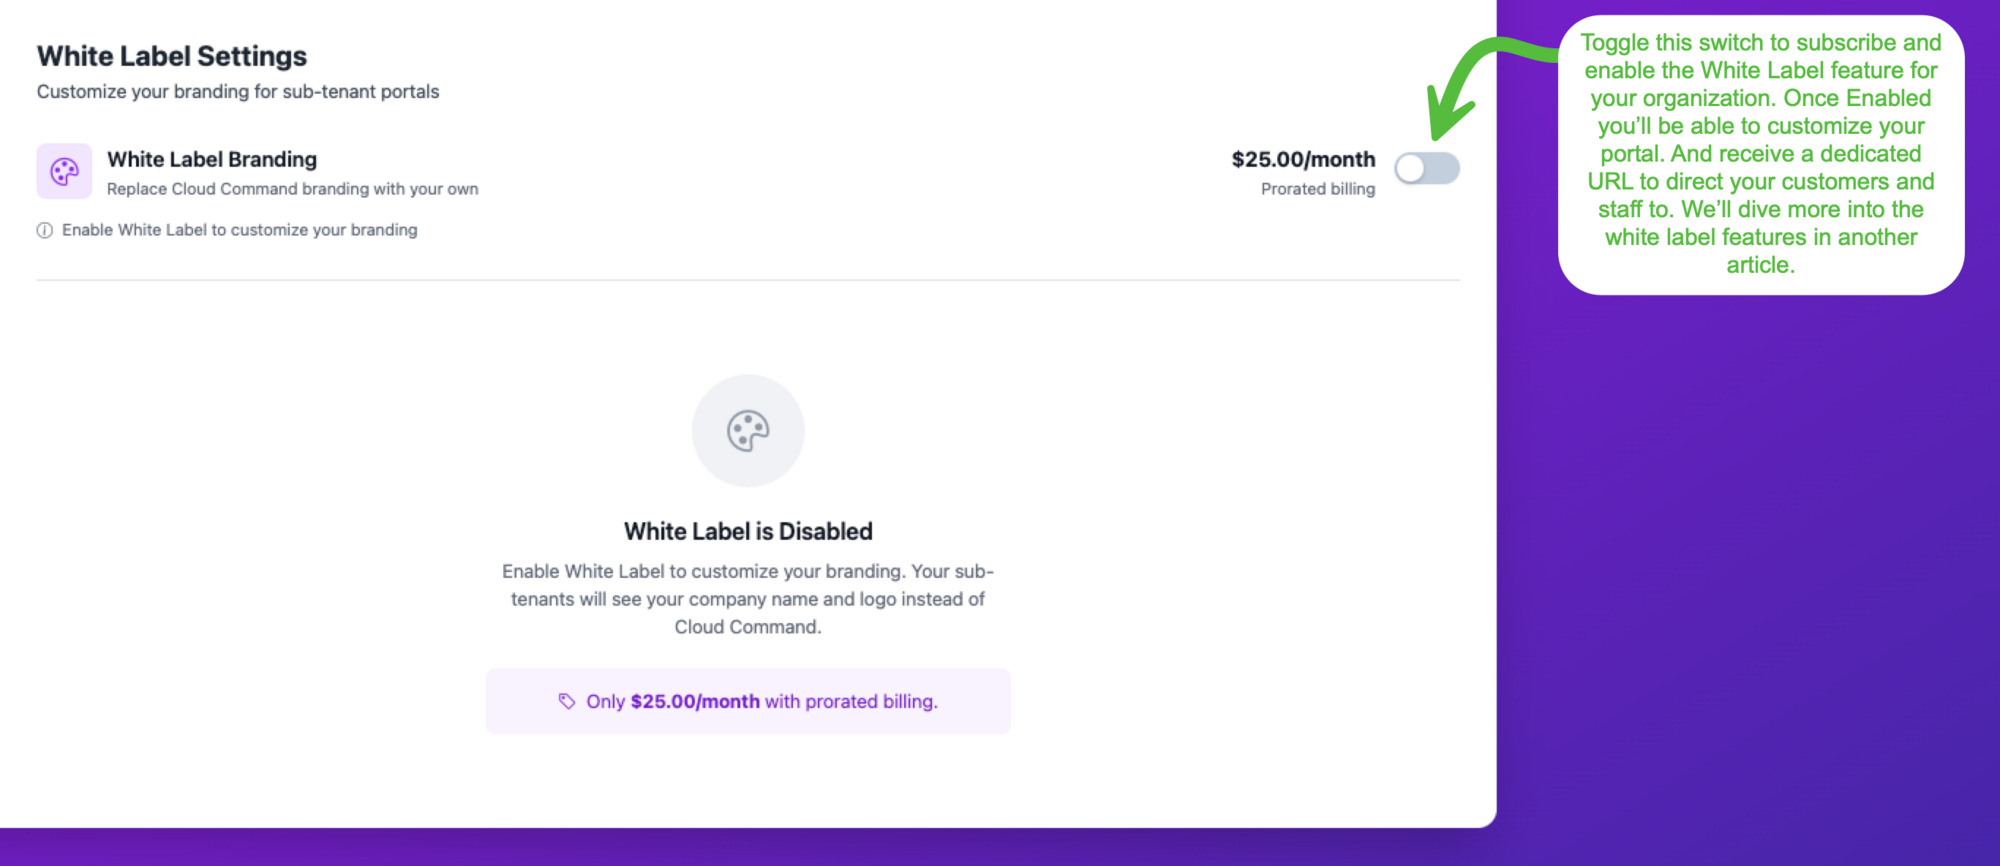
White Label is an optional subscription at $25.00/month with prorated billing. Toggle the switch to subscribe and enable the feature. Once active, you'll be able to customize your portal branding, upload your logos, set support preferences, and receive a dedicated URL to share with your customers and staff.
Need Help?
If you have questions about anything covered in this guide, or need assistance getting started, please submit a support ticket and our team will be happy to help. You can also create a ticket directly from the navigation dropdown on any page in Cloud Command.