Overview
White Label transforms your Cloud Command portal into your own branded experience. Your company name, logo, colors, custom domain, and support information replace all Cloud Command branding, so your customers see your brand from the moment they land on the login page.
Here's what a fully white-labeled portal looks like in action:
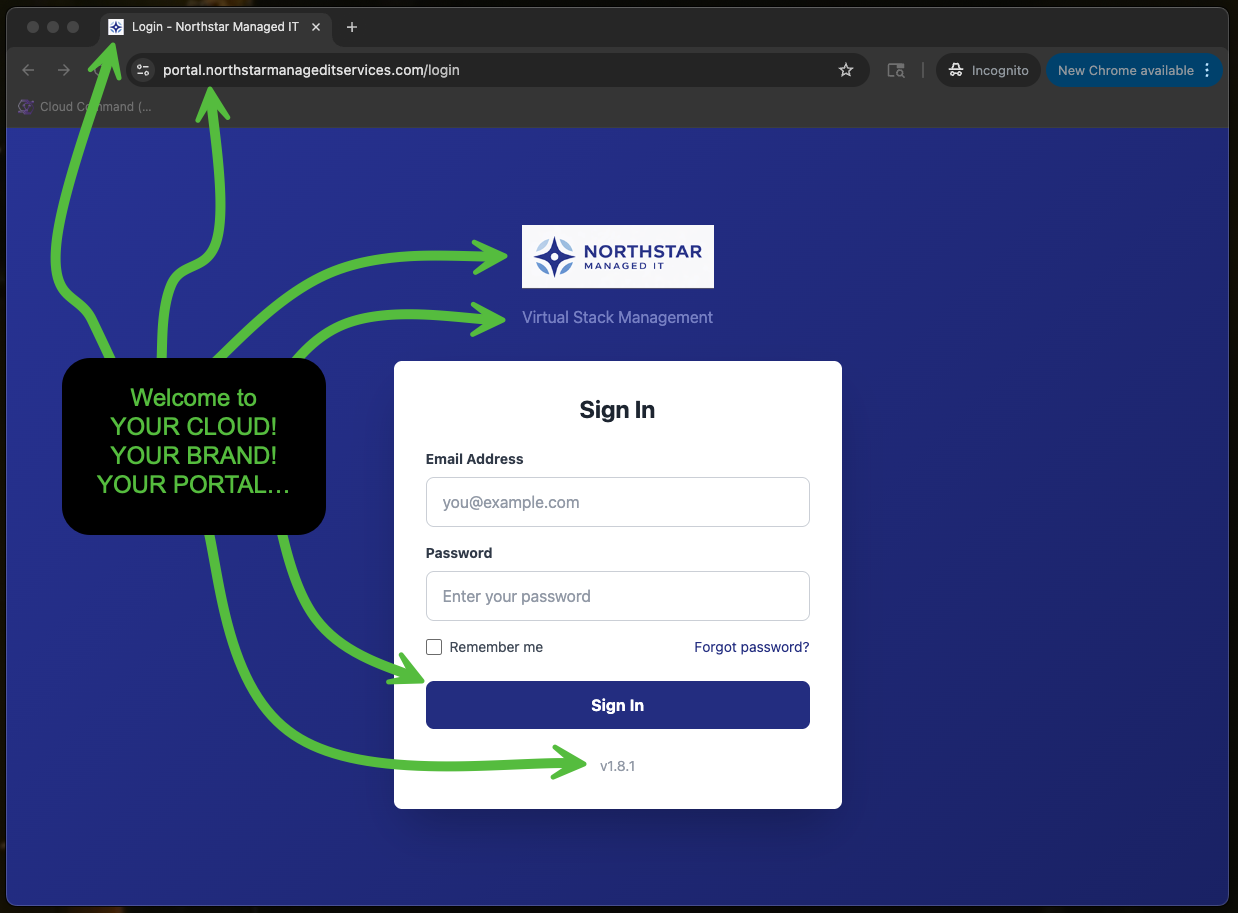
Everything you see above is customizable: the logo, the company name, the tagline, the button and background colors, the browser favicon, and even the domain in the address bar. Your customers and staff will experience a portal that looks and feels entirely yours.
This guide walks you through enabling White Label and configuring each setting step by step.
Enabling White Label
White Label is available as an add-on subscription at $32.50/month with prorated billing. That means if you enable it mid-cycle, you only pay for the remaining days in your current billing period.
Step 1: Open White Label Settings
Navigate to Account Settings in the left sidebar, then click White Label. You'll see the White Label Settings page with a toggle switch in the top right corner.
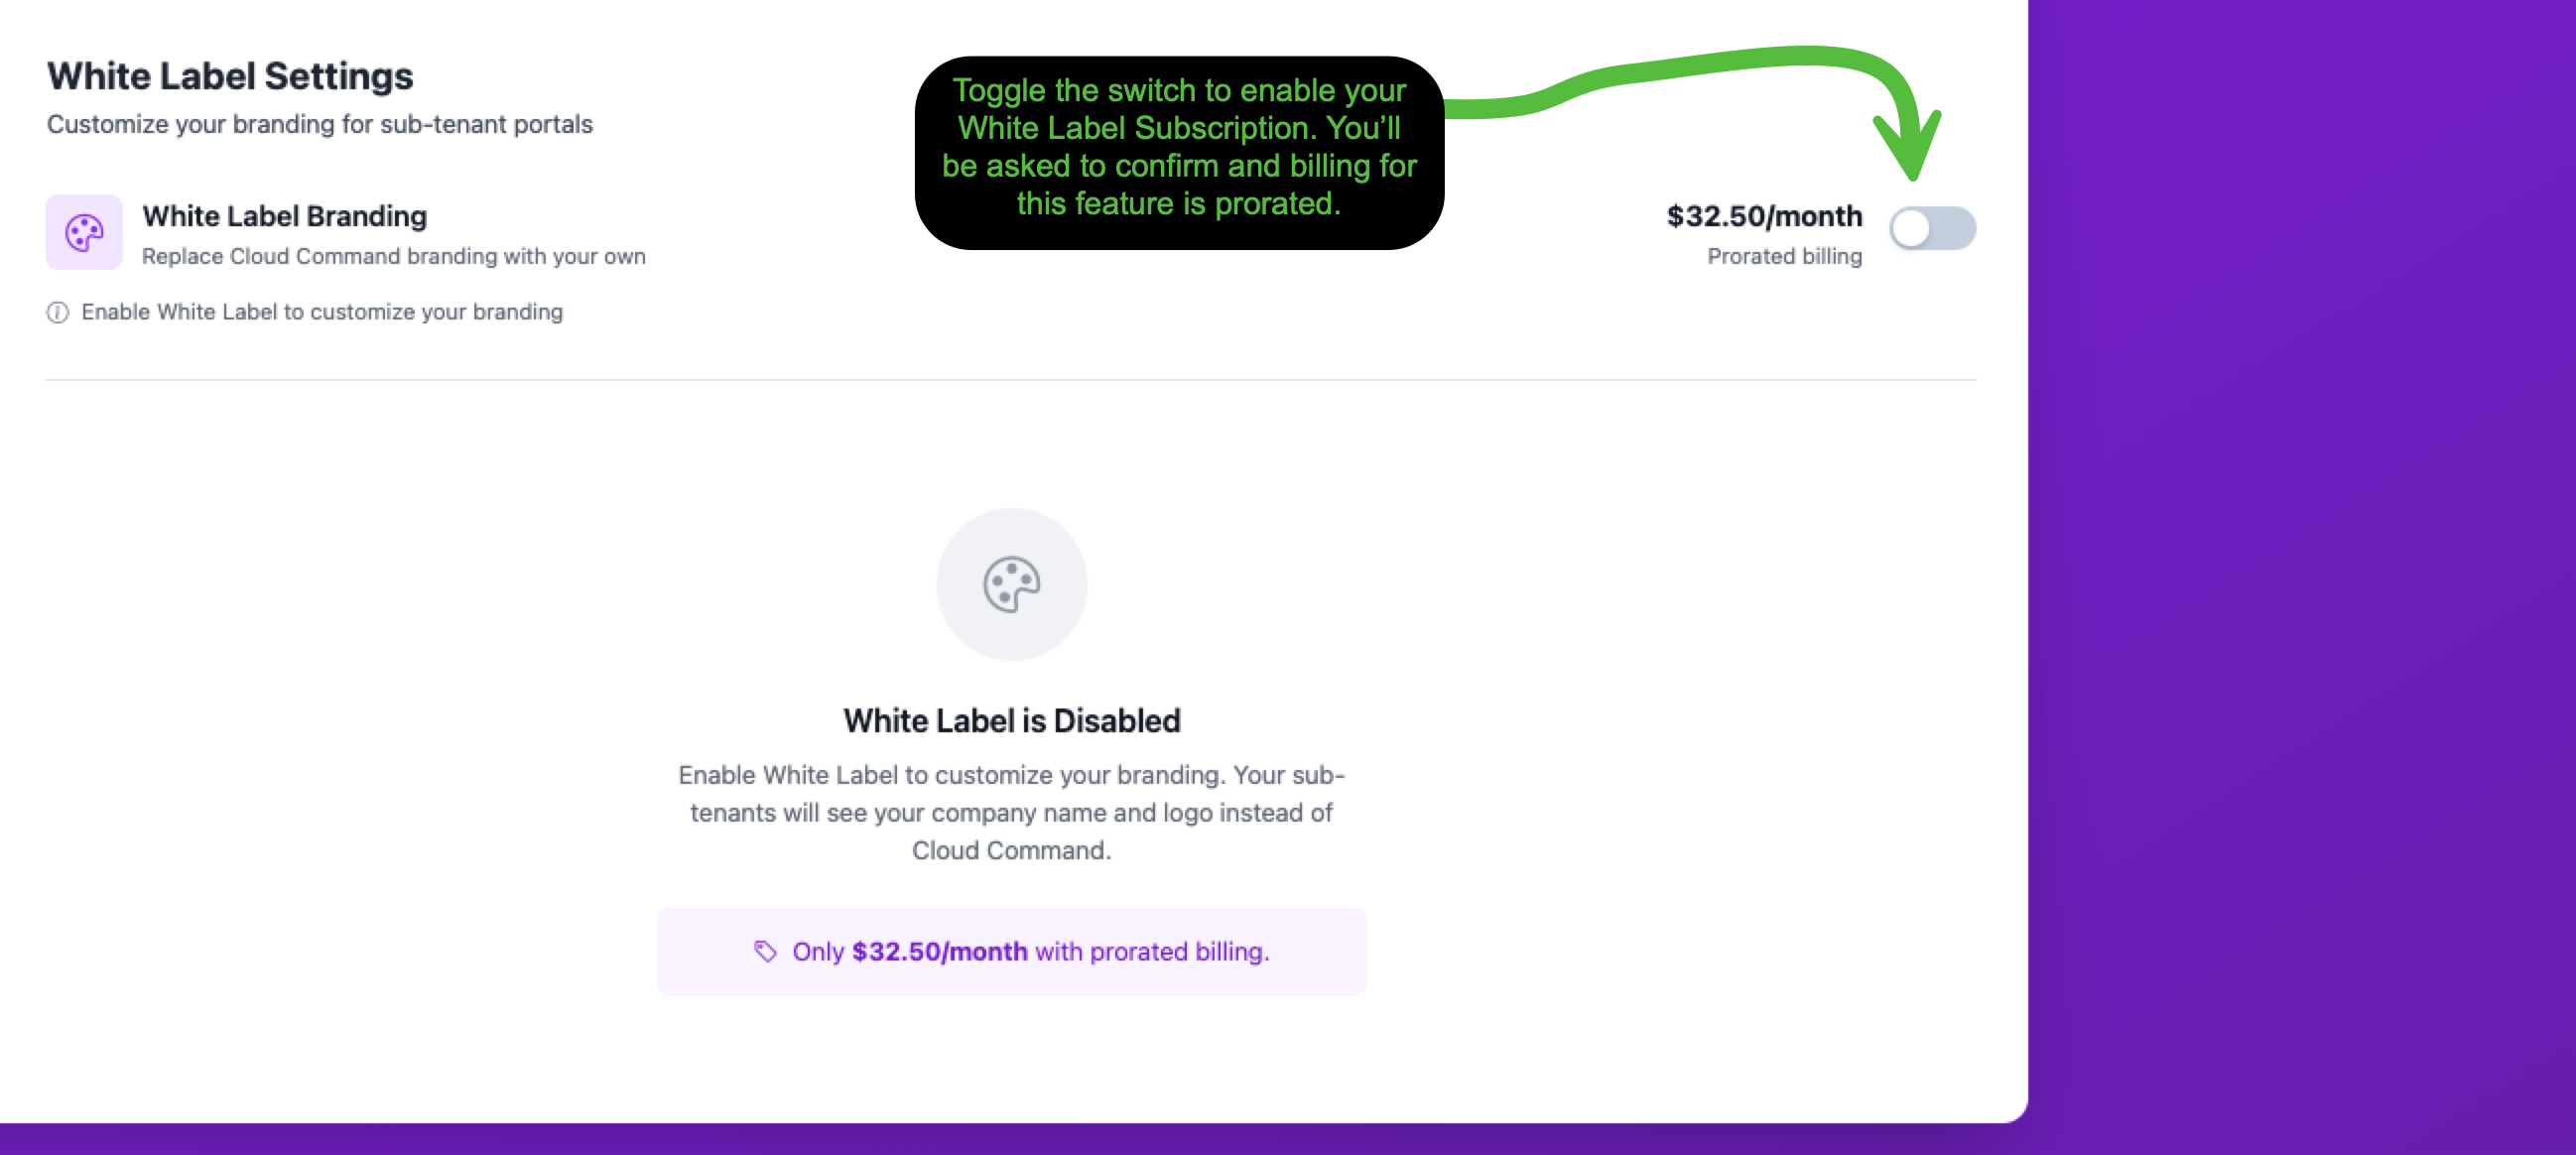
Flip the toggle to enable your White Label subscription. You'll be prompted to confirm billing before anything is charged.
Step 2: Confirm Billing
A confirmation dialog will appear showing your prorated charge for the current billing period and the ongoing monthly rate.
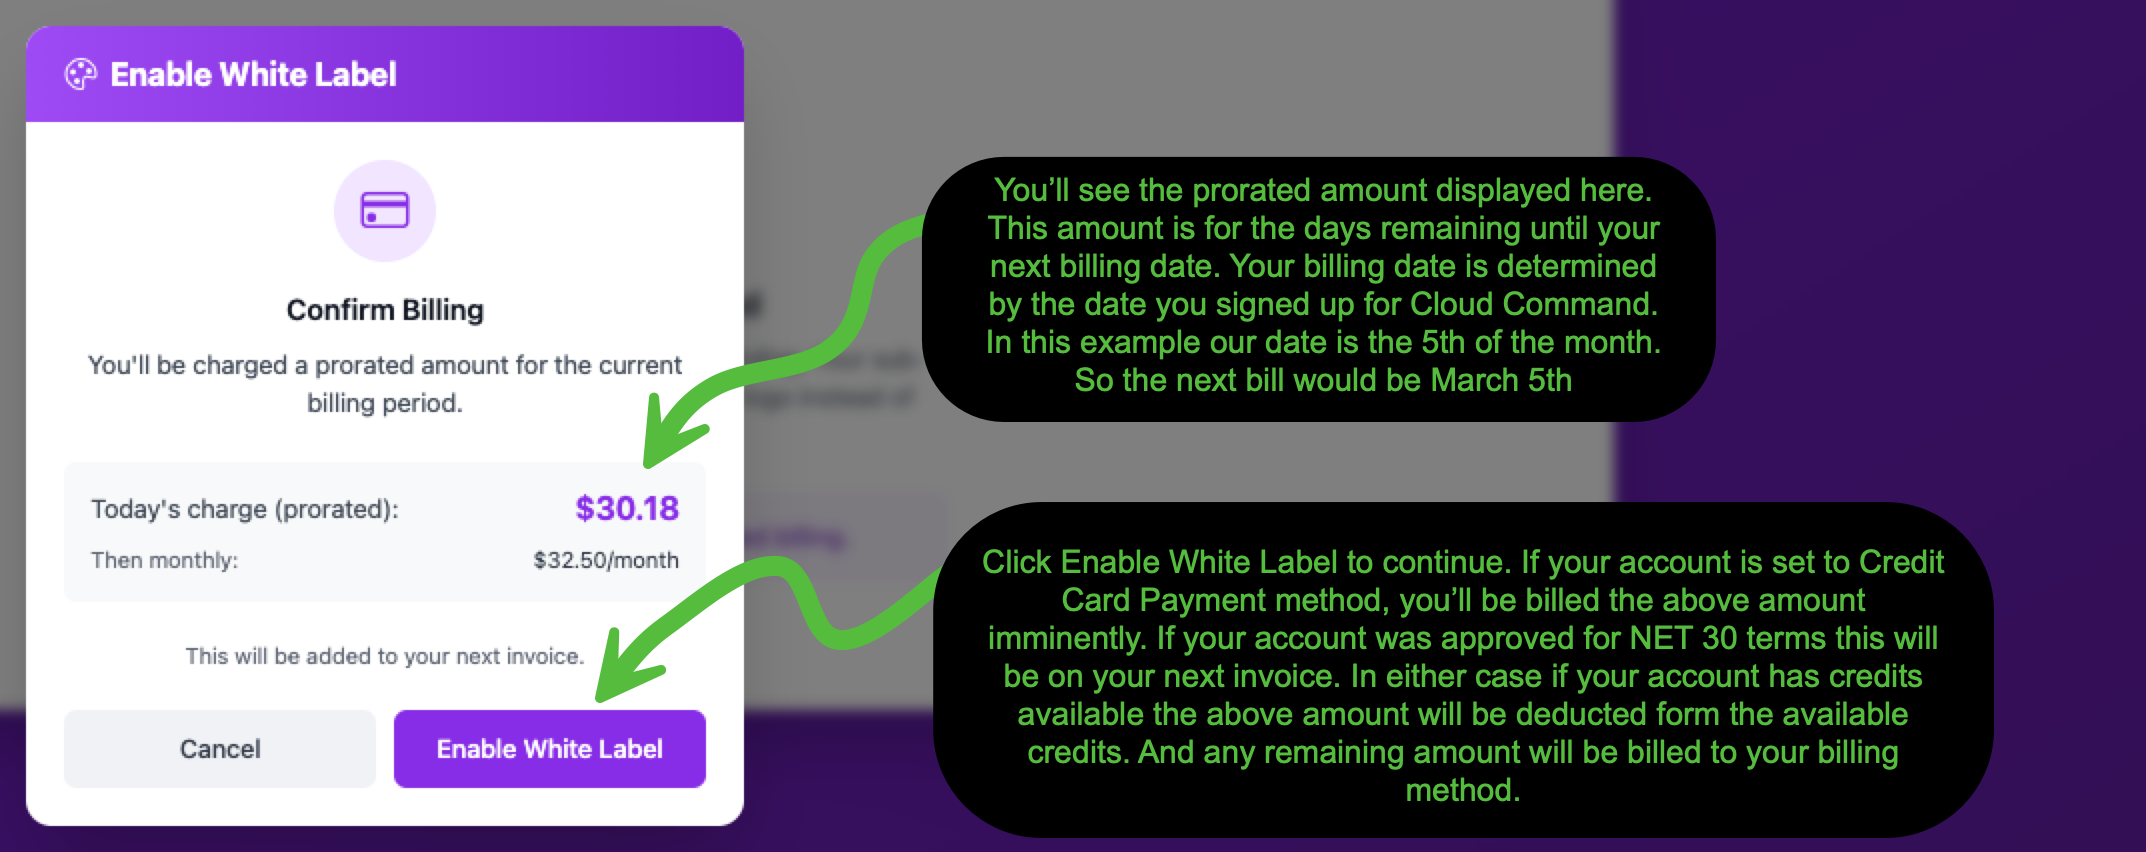
The prorated amount covers the days remaining until your next billing date. Your billing date is determined by the date you originally signed up for Cloud Command.
Click Enable White Label to activate your subscription. You'll see a green confirmation banner at the top of the page, and the five configuration tabs will become available: Branding, Logos & Icons, Domain, Support, and Appearance.
Branding Tab
The Branding tab is where you set the foundation of your white-labeled portal. This is the first tab you'll see after enabling White Label.
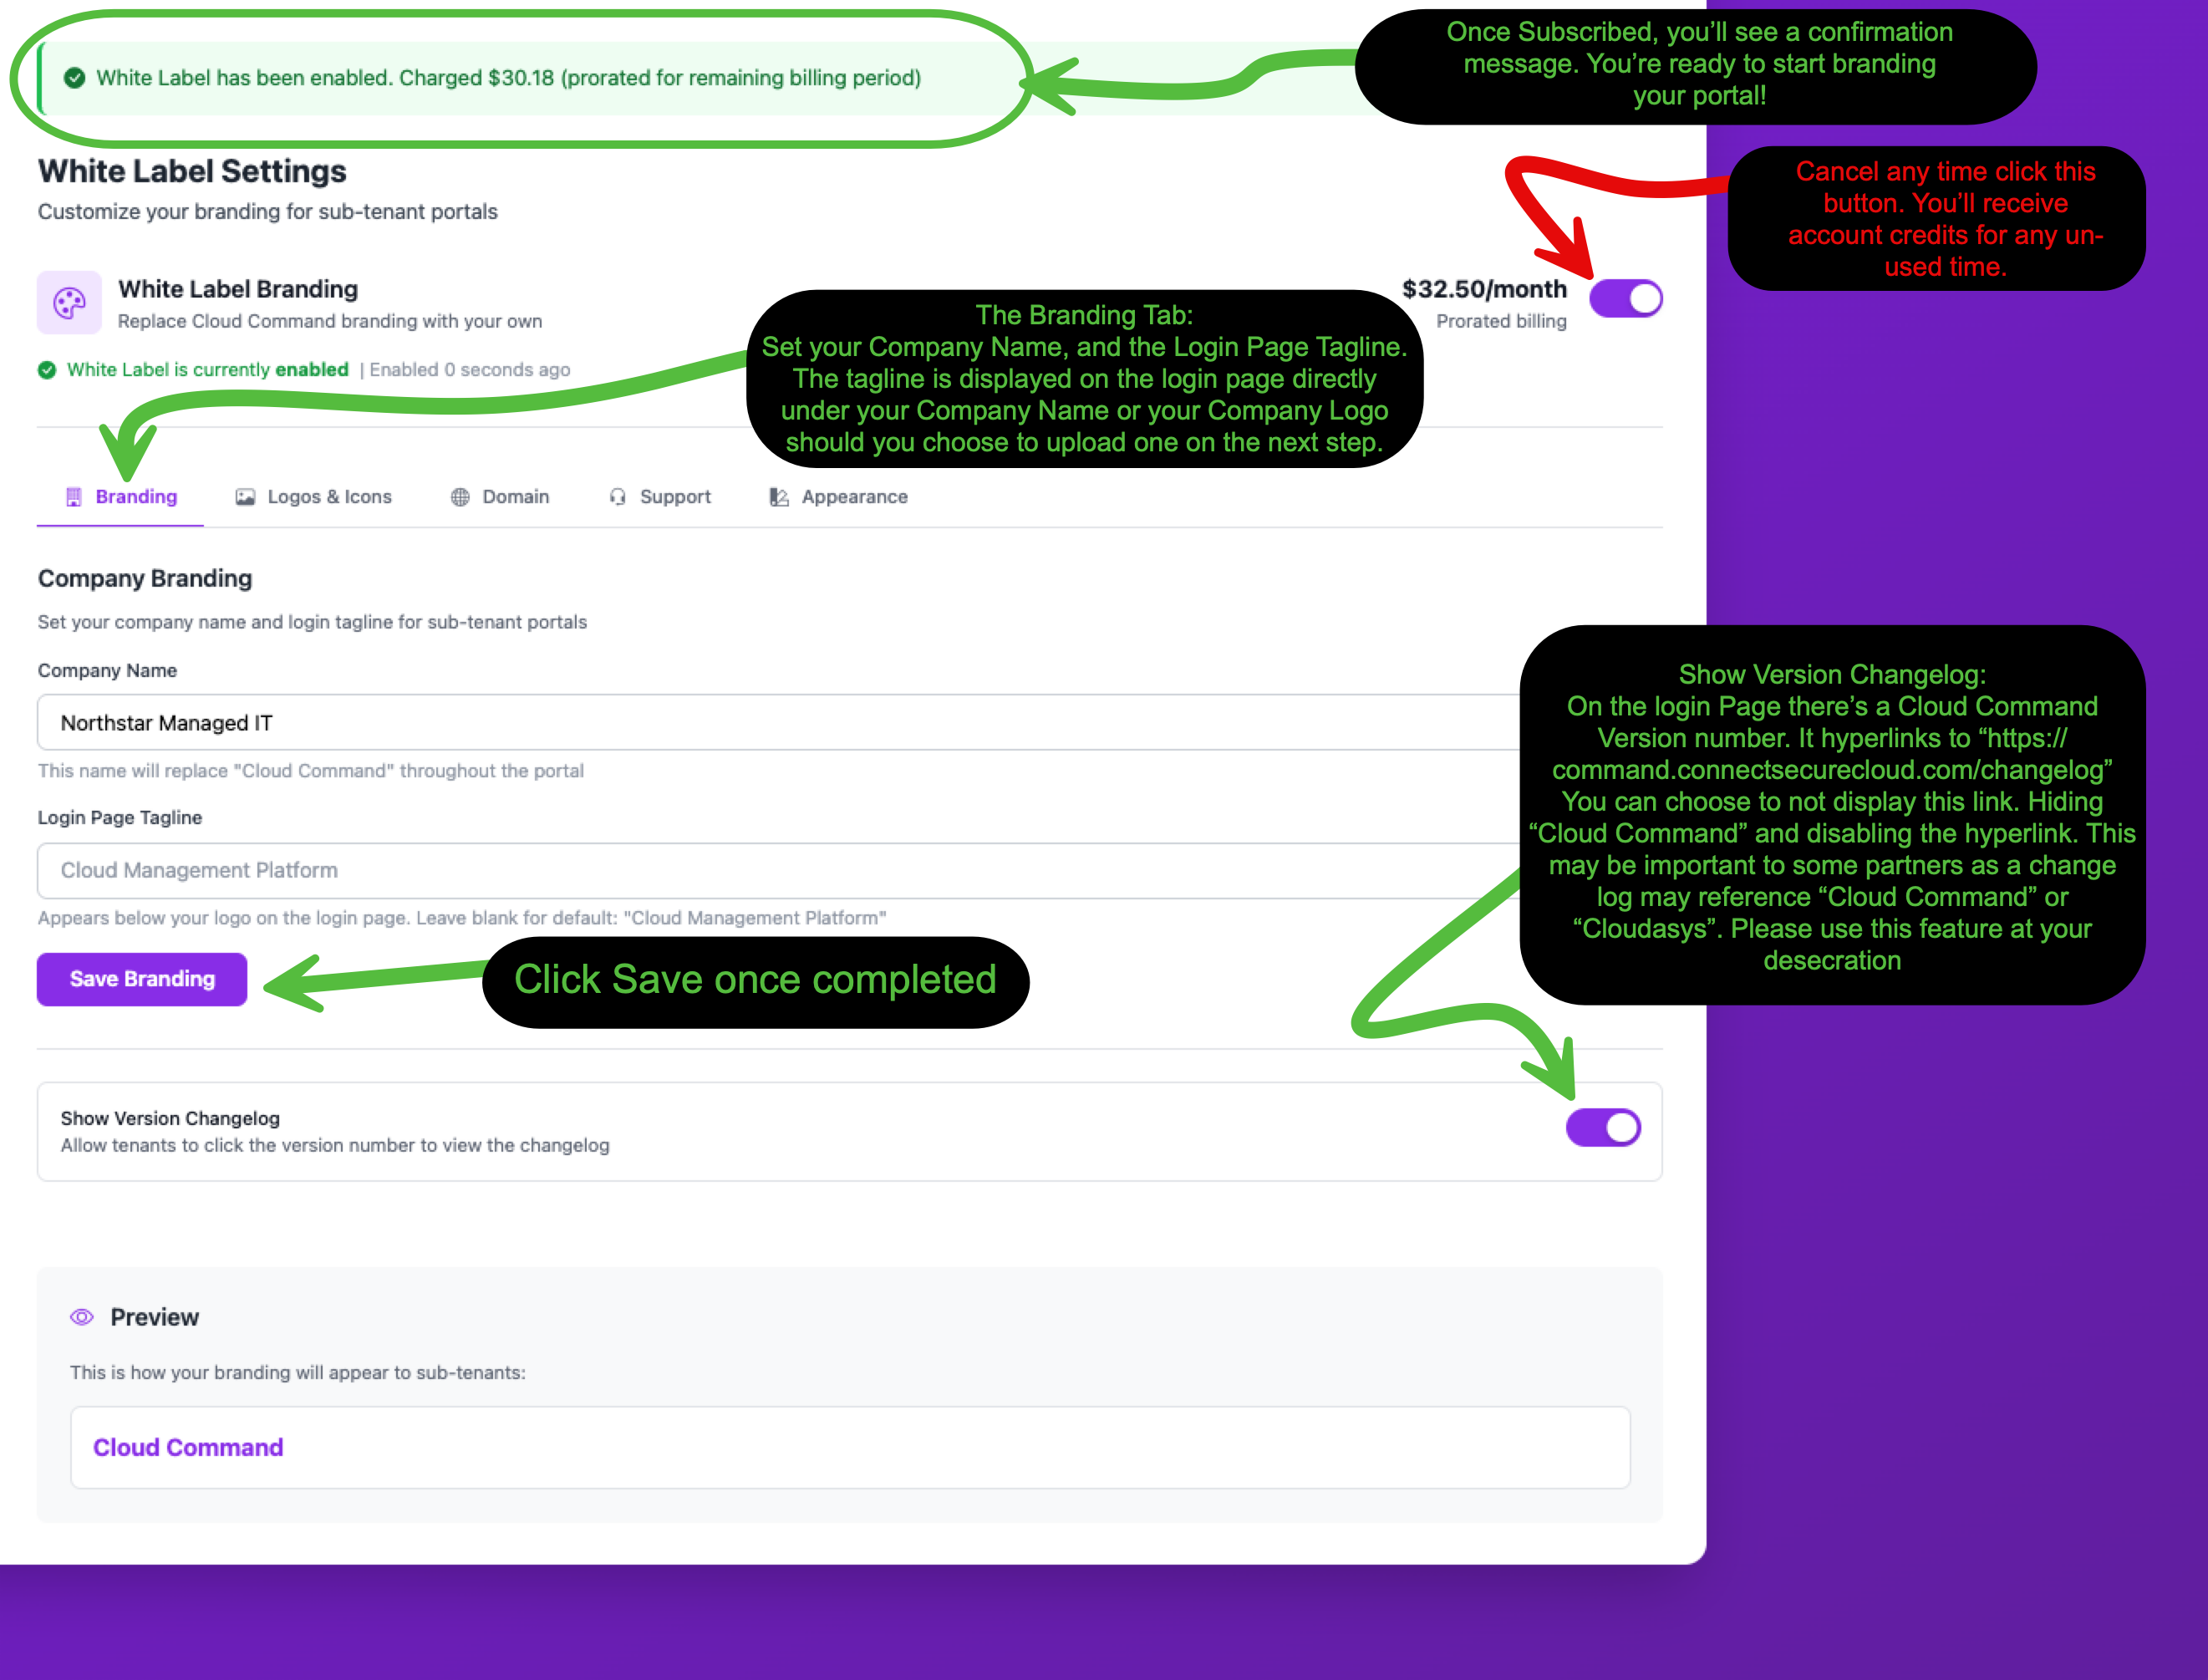
Company Name
Enter your company name in the Company Name field. This name replaces "Cloud Command" throughout the entire portal for your staff and customers. It appears in the navigation bar, on the login page, in the browser tab title, and in the version footer.
Login Page Tagline
The Login Page Tagline appears directly below your company name (or logo) on the login screen. It's a great spot for a short description of your service. Leave it blank to use the default "Cloud Management Platform", or enter something that fits your brand like "Virtual Stack Management" or "Managed Cloud Portal".
Show Version Changelog
The login page displays a version number at the bottom that links to the Cloud Command changelog. If you'd prefer to keep Cloudasys completely behind the scenes, toggle Show Version Changelog off. This removes the hyperlink and makes the version number non-clickable, displaying only your company name and the version number.
Click Save Branding when you're finished. Here's how the login page looks after saving your branding settings:
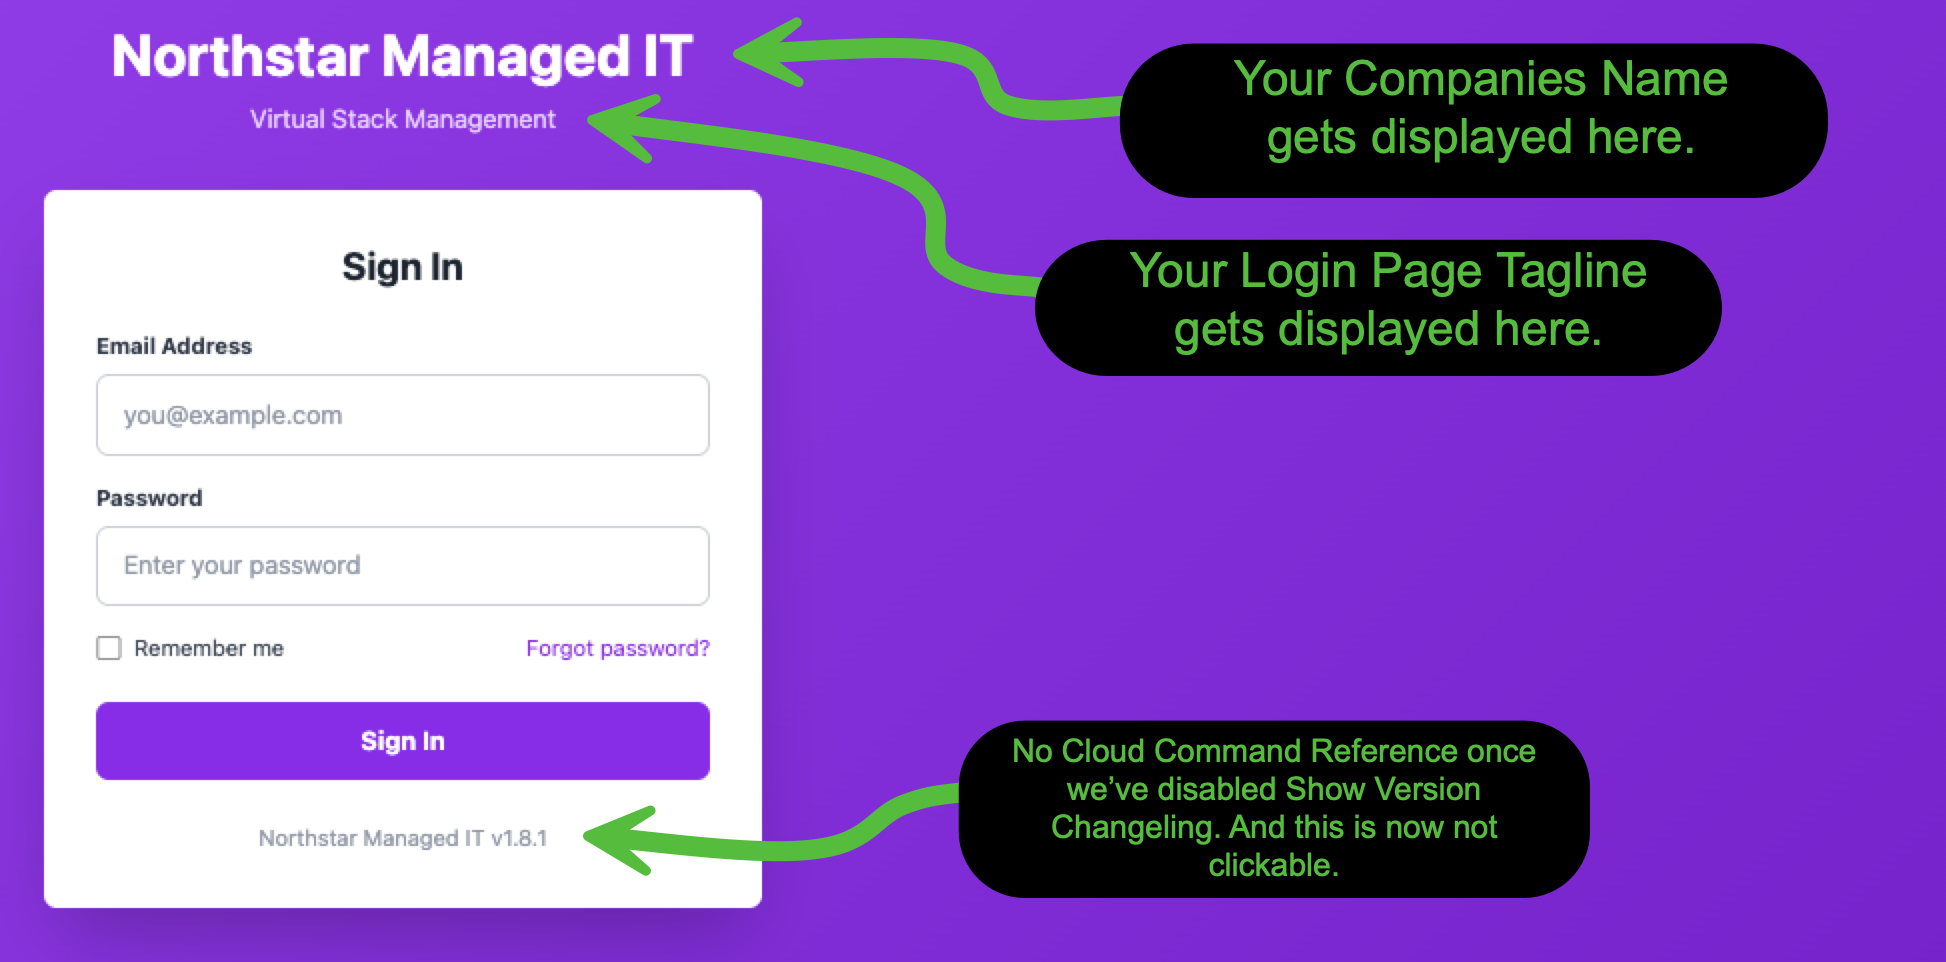
Notice the company name at the top, the custom tagline below it, and the version footer now shows the partner's company name instead of "Cloud Command".
Logos & Icons Tab
The Logos & Icons tab lets you upload your company logos and browser favicon. These images replace the Cloud Command branding across the login page, navigation bar, and browser tab.
![]()
There are three images you can upload:
| Image | Recommended Size | Max File Size | Where It Appears |
| Navigation Logo | 200 x 50 px | 3.5 MB | Top-left of the navigation bar on every page |
| Login Page Logo | 300 x 100 px | 3.5 MB | Above the sign-in form on the login page |
| Browser Favicon | 64 x 64 px | 1 MB | Browser tab icon |
Click or drag your image files into each upload area. You'll see a preview of the uploaded image immediately. A "Preview in tab" section on the right shows how your favicon will look in a browser tab.
After uploading your logos, here's how they appear on the login screen and in the navigation bar:
![]()
Your Login Page Logo is displayed prominently above the sign-in form, along with your tagline below it.
![]()
Your Navigation Logo appears in the top-left corner of every page, visible to both your staff and your customers.
Domain Tab
The Domain tab controls how your customers access your branded portal. You have two options: use the provided Cloud Command portal URL, or set up your own custom domain.
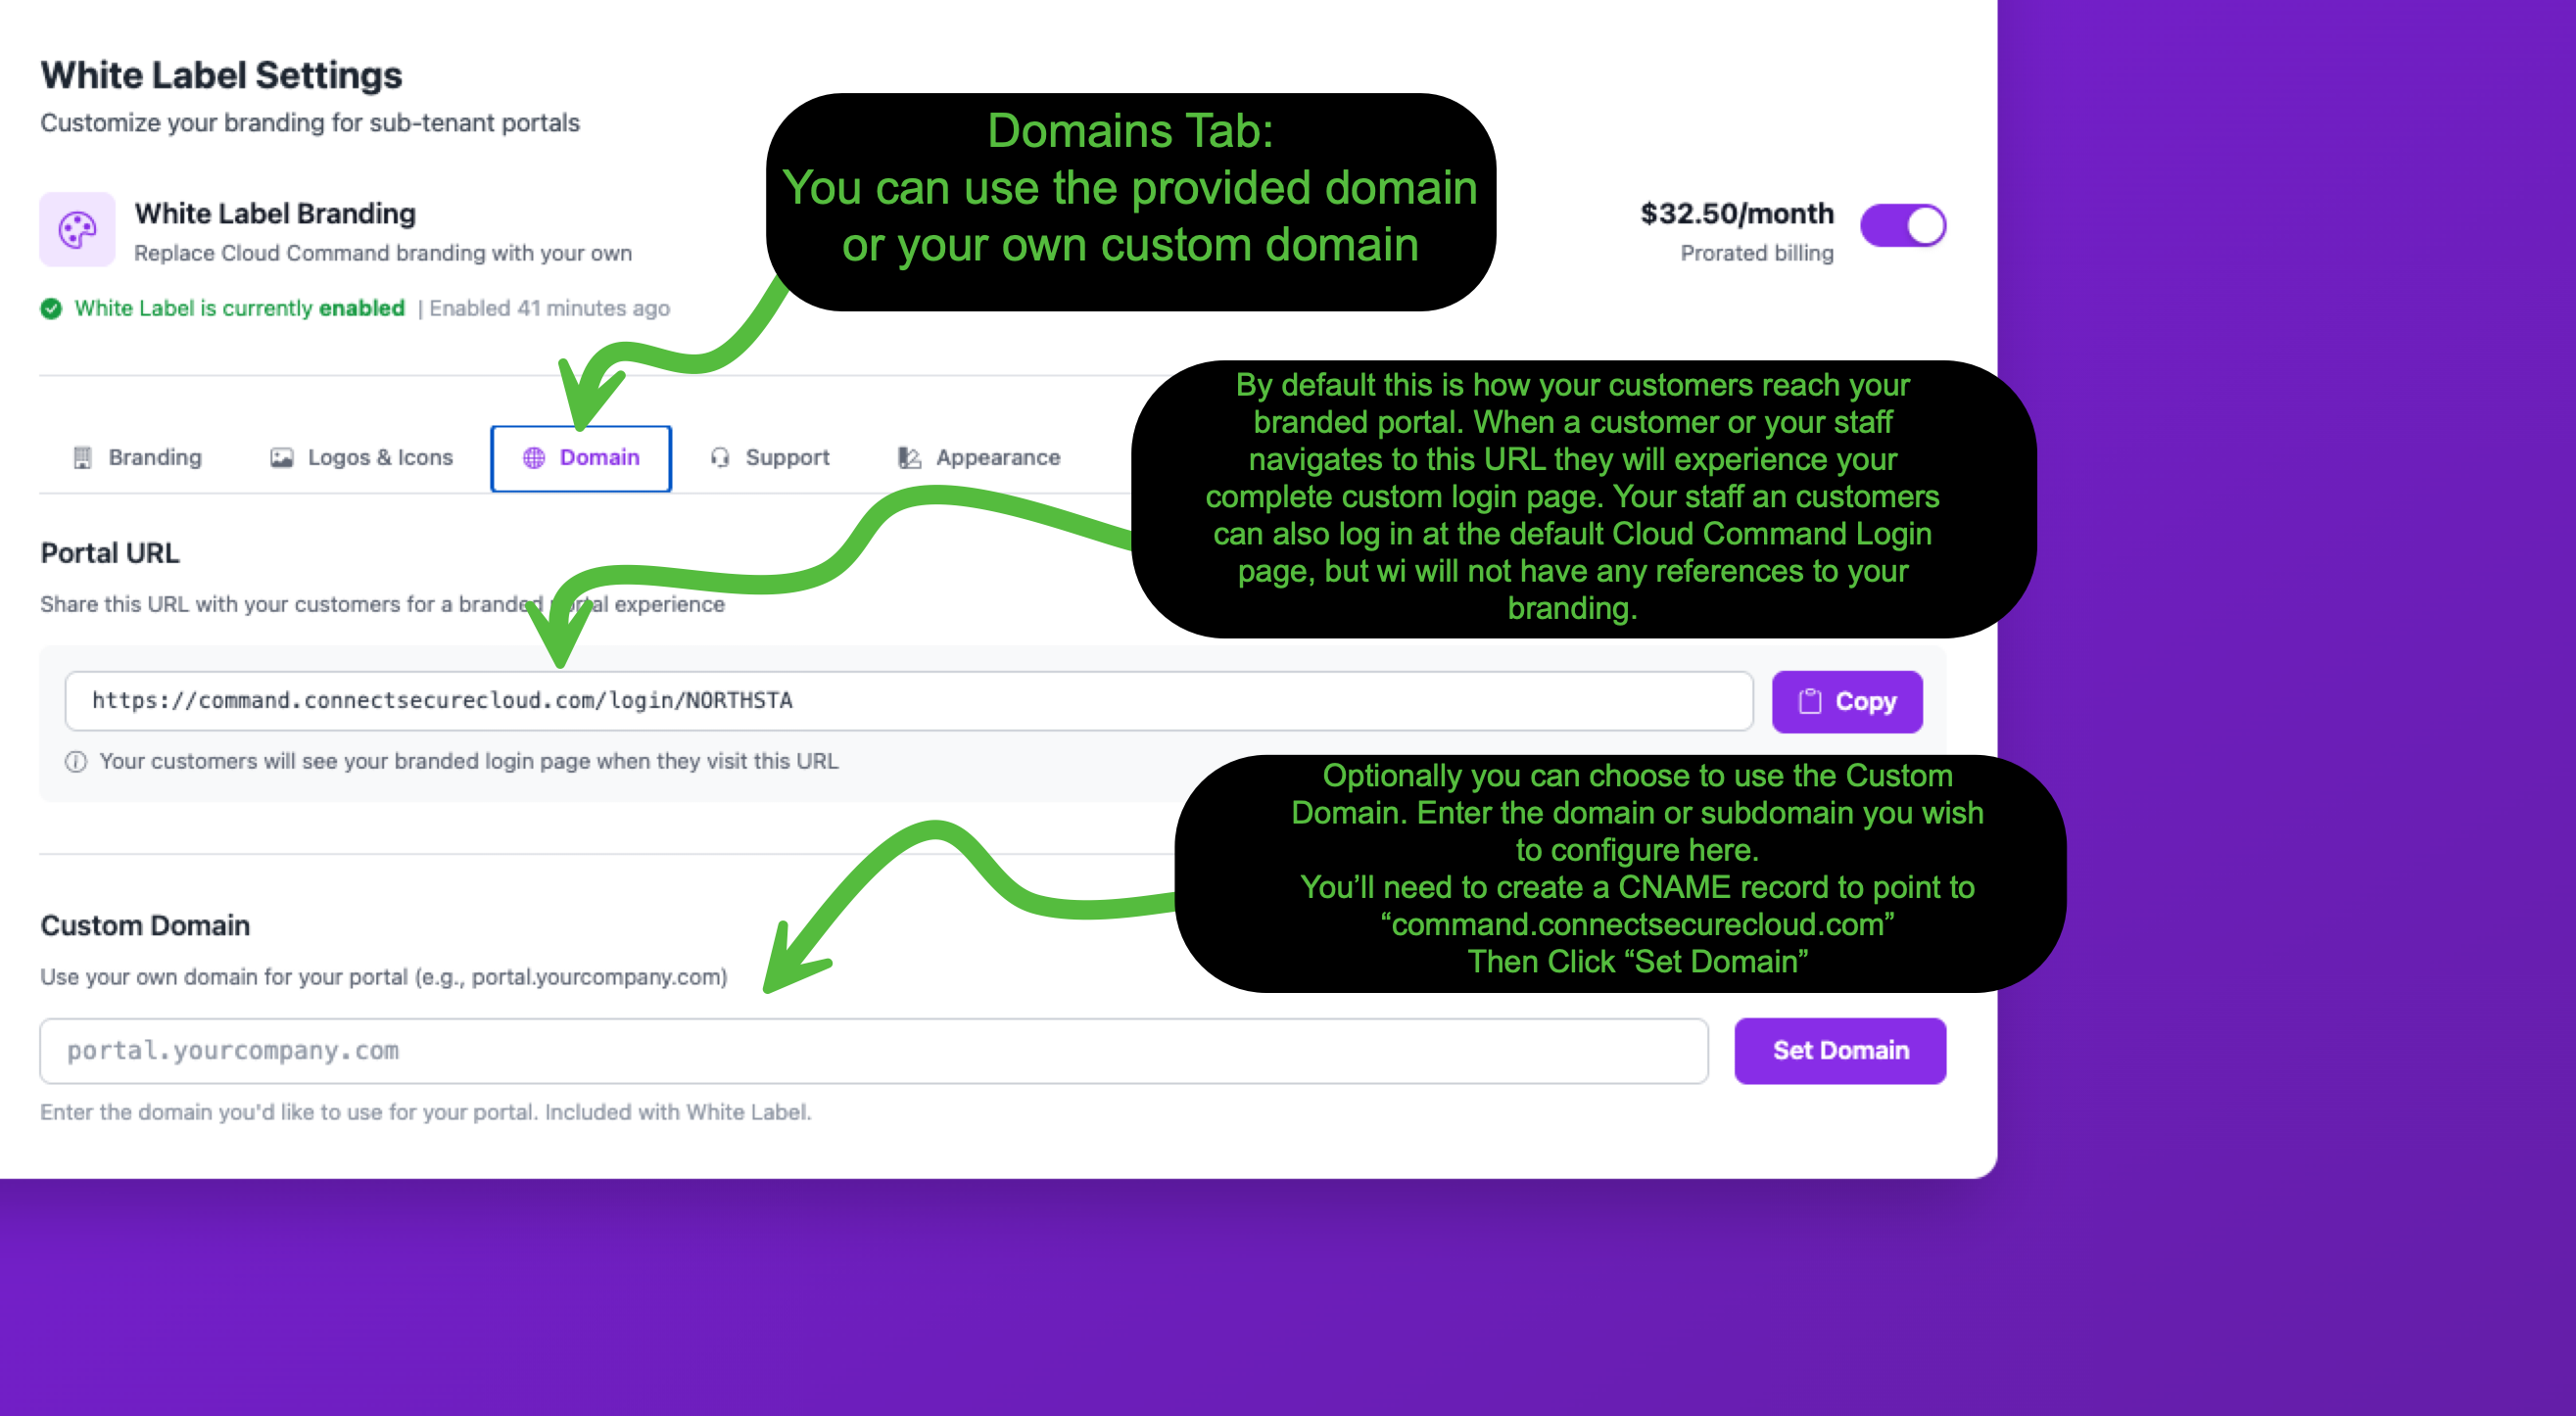
Portal URL (Default)
When White Label is enabled, you automatically receive a branded portal URL in the format:
https://command.connectsecurecloud.com/login/YOURSLUG
Share this URL with your customers for a fully branded login experience. Click the Copy button to grab the URL quickly. Anyone who visits this link will see your custom branding, logos, and colors.
Custom Domain (Optional)
Want your portal on your own domain? You can configure a custom domain like portal.yourcompany.com at no extra cost. This is included with your White Label subscription.
Step 1: Enter Your Domain
Type your desired domain or subdomain in the Custom Domain field and click Set Domain. The system will show you the DNS setup instructions.
Step 2: Create a CNAME Record
Log in to your DNS provider and create a CNAME record pointing your domain to command.connectsecurecloud.com. Here's an example of what that looks like:
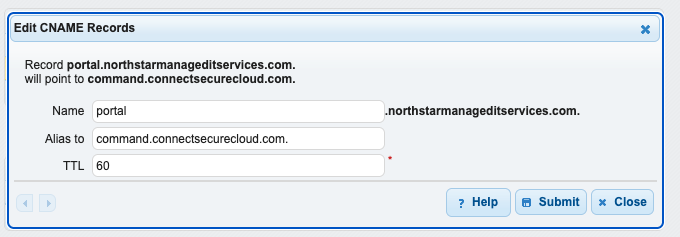
| Field | Value |
| Type | CNAME |
| Name | Your subdomain (e.g., portal) |
| Value / Alias | command.connectsecurecloud.com |
| TTL | 60 (low TTL recommended for faster propagation) |
Step 3: Verify DNS
Once you've created the CNAME record at your DNS provider, come back to Cloud Command and click the Verify DNS button. The system will check that your record is resolving correctly.

Step 4: Provision SSL & Activate
After DNS is verified, you'll see the DNS Status change to Verified (green checkmark). Now click Provision SSL & Activate to generate a free SSL certificate for your custom domain.
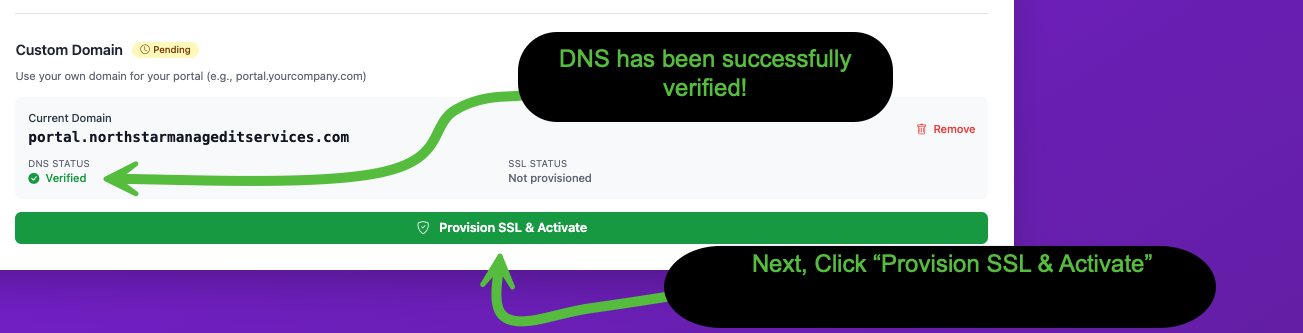
This takes just a moment. Once complete, your custom domain is fully configured, secured with SSL, and ready to go.
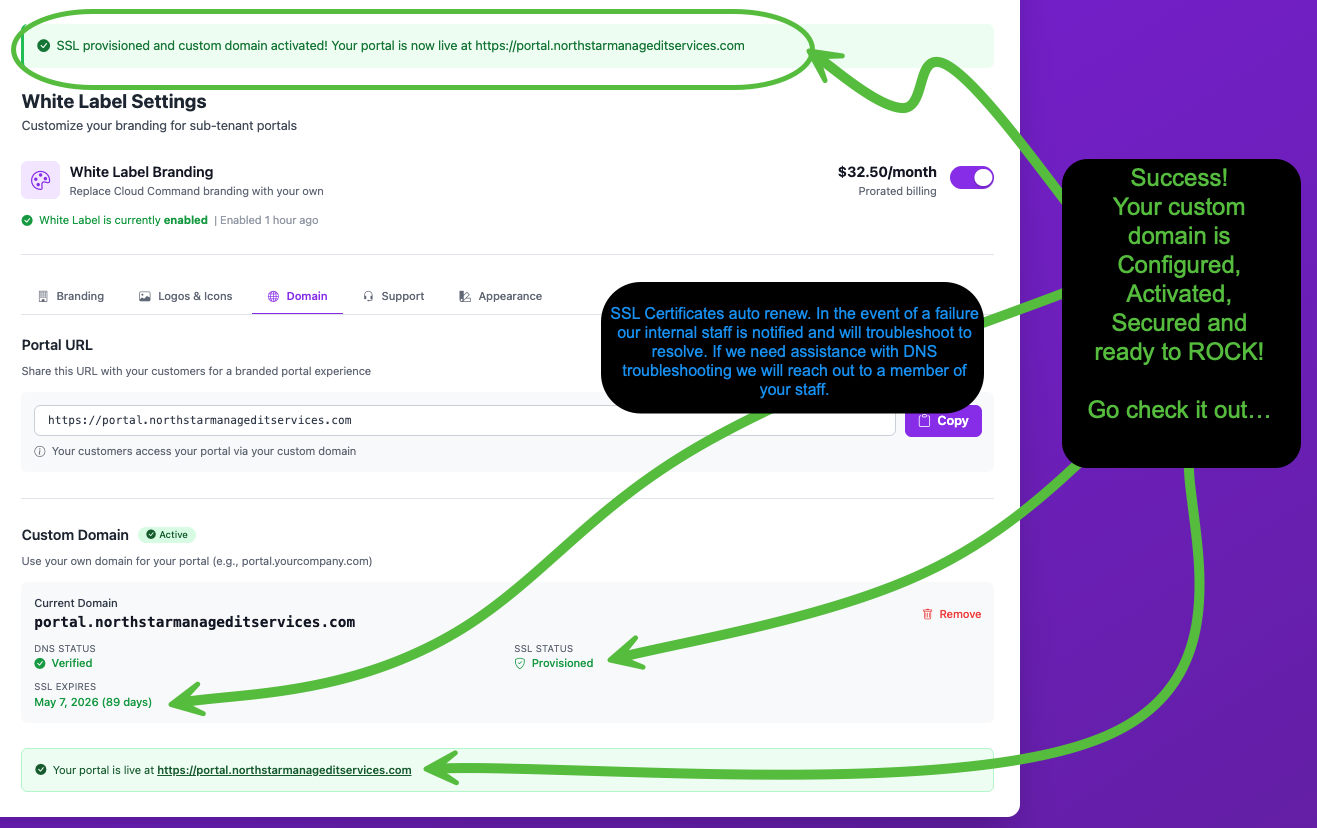
You'll see a confirmation banner and your Portal URL will update to your custom domain. The status panel shows DNS Verified, SSL Provisioned, and the SSL certificate expiration date.
Support Tab
The Support tab lets you configure how your customers find help and submit support requests. As a partner, you're responsible for directly supporting your customers' virtual environments. This tab ensures they can easily reach you.

Support Email
Enter the email address where your customers should send support requests. This address is displayed on the support page in your customer portal. If you enable the Support Request Form (see below), form submissions will also be sent to this address.
Support Phone
Provide a phone number for customers who need immediate assistance. This is optional. If left blank, no phone number will be displayed to your customers.
Custom Support Page Content
This text box lets you write a custom message that appears on your customers' support page. HTML is allowed, so you can format it however you'd like. This is a great place to set expectations around response times, outline best practices for submitting tickets, or share links to other resources.
Show Knowledge Base Links
Toggle this on to display Cloud Command Knowledge Base articles in your customer portal. This gives your customers access to helpful guides and documentation.
Enable Support Request Form
When enabled, your customers will see a "New Support Request" button that opens a structured form. The form collects:
- Category General, Technical, Billing, or Other
- Priority level Low, Normal, High, or Urgent
- Subject line A brief summary of the issue
- Detailed description Full details about the request
- File attachment Optional supporting files
Submissions are emailed to the Support Email address you configured above. This integrates nicely with popular PSA/ERP/CRM tools and support desk systems that accept inbound email tickets.
Click Save Support Settings when you're finished.
Appearance Tab
The Appearance tab lets you match the portal's look and feel to your company's brand colors. Choose from seven preset color themes or pick a completely custom color.

Preset Color Themes
Select any of the built-in color palettes to instantly restyle the entire portal:
| Theme | Description |
| Purple | The default Cloud Command theme |
| Blue | Professional and corporate |
| Teal | Fresh and modern |
| Green | Growth and nature |
| Red | Bold and energetic |
| Orange | Warm and friendly |
| Slate | Neutral and minimal |
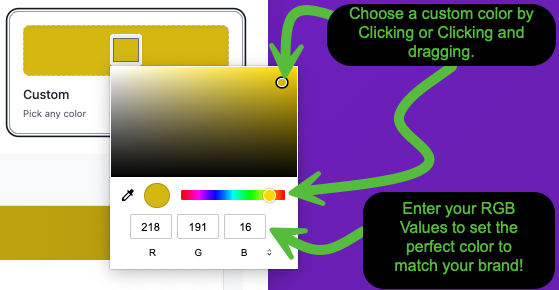
Custom Color
If none of the presets match your brand, select Custom to open the color picker. You can click and drag to find the perfect shade, or enter your exact RGB values for a precise match.
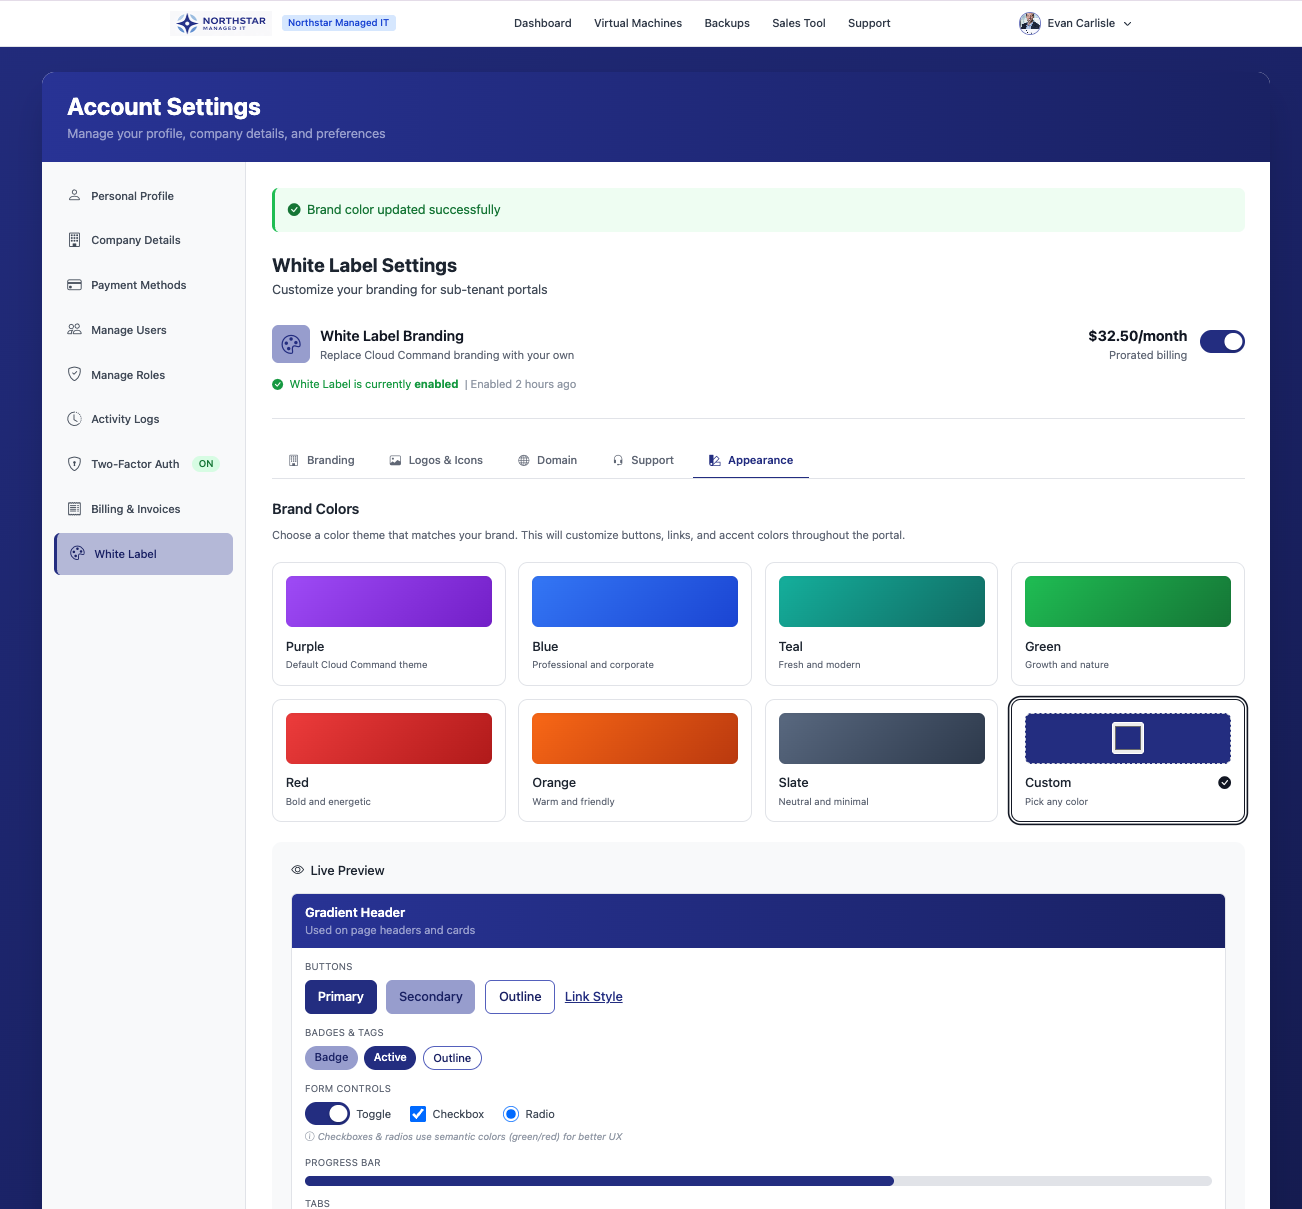
Live Preview
As you select different colors, the Live Preview section at the bottom of the page updates in real time. You'll see how your chosen color affects gradient headers, buttons, badges, form controls, progress bars, tabs, icons, alerts, and card accents before you commit.
This color will be applied across the entire portal, including the login page, navigation elements, and all interactive components your customers see.
Click Save Brand Color when you're happy with the result.
The End Result
Once you've configured all five tabs, your portal is fully white-labeled. Here's what your customers will experience when they visit your branded login page:
Everything comes together: your custom domain in the address bar, your company logo front and center, your brand colors on the buttons and background, your tagline, and your custom favicon in the browser tab. Your cloud, your brand, your portal.
Need Help?
If you have questions about White Label setup or run into any issues during configuration, please submit a support ticket and our team will assist you.